DIY SASS Microphone w/EM272 Capsules
Learn how to make your own ultra low noise SASS microphone in this article!
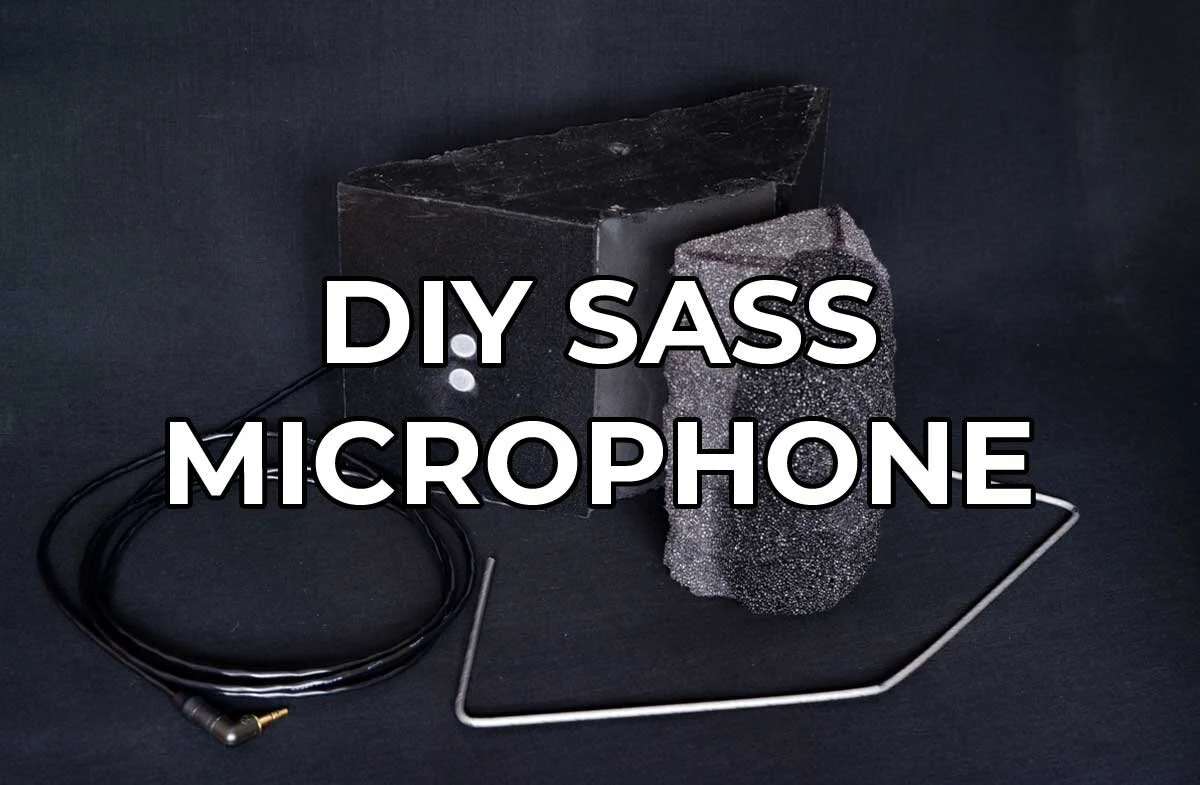
My SASS microphones are my primary mics. They’re ultra-low noise, can be disassembled for efficient storage in a backpack, and are designed to capture soundscapes how humans really hear them. Soundscapes recorded with them create immersive, three-dimensional landscapes of sound.
Based on the designs of others who created their own SASS microphones, I came up with my own design. My design uses readily available materials and is designed to be as lightweight and compact as possible.
Table of Contents:
• Design • Materials • Tools • Instructions • Sound Demo
Design


Completed SASS Microphone:


Materials
If you’ve familiar with DIY projects, you know how important it is to have extra materials. Whenever you’re making something new, mistakes are bound to happen. With this in mind, I created the following materials list. As an Amazon Associate, I earn from qualifying purchases.
9”x6”x3” yoga block with no logos/texture (get 2-pack for mistakes)
Open cell foam (40 PPI density)
Heat Shrink (kit good for different sized wires)
Tools
Not all of the items on this list are mandatory but they will make your life easier. Hopefully you own some of the following items already. As an Amazon Associate, I earn from qualifying purchases.
Building Instructions
From the images and design diagrams above, I think most people will already have a pretty good idea about how to create their own SASS microphone. However, some of the steps involved can be difficult to get right.
The remaining sections of this article will provide helpful details on those steps. If you have any questions, please contact me, I’m happy to help.
Cutting the Yoga Block
Cutting the yoga block properly is trickier than it looks. It took me a few tries before I was able to get consistent, symmetrical cuts at the proper angle. The system that worked well for me is listed below.
To make the cuts, I used a 32 TPI hack saw blade with a hockey-taped handle. If you have a band saw, that would be ideal.
If you want to experiment with alternate dimensions, this trapezoid calculator is helpful for finding the angles.
Find and mark the center of each 9” side.
Connect marks to draw center line. I found ballpoint pens work well and are decently visible on the black yoga block material. A silver gel pen would probably work better.
On one 9” side, measure and mark 1.5 inches from center line in both directions.
On opposite side, measure and mark center of both chamfered corners.
Draw diagonal lines between marks as pictured. This is your cut line.
Repeat on reverse side and connect cut lines on face of yoga block as pictured below. This will give you good guide lines to follow for the entire cut.
Wiring Capsules
Wiring the EM272 capsules in parallel is pretty easy to do with a set of helping hands and a temperature-controlled soldering iron (setting “4” works well for this).
The key is to minimize the contact time between soldering iron and capsule. If the capsule gets too hot, it can break or become less sensitive.
At this point, you’ll want to solder about 6” of extra cable onto one of the EM272 capsules from each pair. This extra length will be for routing through the yoga block.
For more tips on wiring and setting up the helping hands, see my post on making a stereo pair of EM272 capsules.
DO NOT CONNECT 3.5MM JACK YET!
Cutting and Drilling Plastic “Ears”
Starting with a sheet of 1/4” high density plastic, measure and mark two 5” x 4” rectangles. Use a utility knife to make the cuts; it will take a few passes. I recommend using a ruler to make the cuts as straight as possible.
After finding the center by connecting the corners, measure and mark 6mm above and below center. The EM272 capsules are exactly 10mm wide so this will space the capsules by 2mm. It’s important to have the capsules as close together as possible to avoid phase issues.
Using a step bit, drill marked holes to a width of 13/32”. 13/32” is 10.3mm; slightly larger than the EM272 capsule. I found that it was easier to install the capsules into this wider diameter than exactly 10mm.
Cable Routing
Hold the finished “ears” against the yoga block. Use a pen to trace the holes onto the yoga block. Remove ears and use a 1/4” steel rod to puncture the yoga block and create a path for the wires to travel through the block.
I prefer having the cable exit hole on the bottom of the SASS. My first design had the cable coming out of the back which was a problem when mounting the SASS on a tree.
It can be tricky to get both cable paths to lineup with the same exit hole but is worth the effort for a cleaner look.
Creating the Nose
The nose is the baffle that sits between the ears. It mimics a human face and helps to create a realistic stereo image. The finished nose should measure 5” tall, 3” wide and 2” thick.
Starting with a sheet of 40 PPI foam, cut out three 3” x 2” rectangles. Using a spray adhesive, glue the three pieces together. After the glue has dried, use scissors to cut and shape the foam to its final dimensions (5”h x 3”l x 2”w).
To increase the directionality and stereo image width, you can seal the front of the nose with Plastidip. I think this creates the most realistic and immersive audio. Mask the sides of the nose with masking tape and spray with 6 coats of Plastidip.
Making the Basket
After completing the nose, your SASS can be complete (after wiring 3.5mm jack). Adding steel rods to create a basket around the nose makes wind protection simple and also allows the SASS to be compactable.
This is probably the most difficult step and requires a relatively expensive tool: a manual rod bender. There are cheaper rod benders out there but the one made by Huth is the one I used. It is solid, machined with very tight tolerances, and works great.
Watch this video to see how the brackets are installed.
Sound Demo
Below are just a few examples of how this microphone performs in the field. For many more examples, please see my SoundCloud page.
Final Thoughts
I’m always trying to improve on the design of this SASS microphone. If you have any suggestions, please leave a comment at the bottom of this page or contact me directly.
Support Acoustic Nature
If you enjoyed this post and would like to help support Acoustic Nature, please consider "buying me a coffee" or becoming a Patreon with the buttons below.
As a thank you for your support, Patreon supporters receive a copy of Field Recording For Beginners, exclusive access to the full Behind The Sounds video series, nature sound library downloads, and more.
If you are unable to support the site financially, please share this post with others, or leave a comment below letting me know you enjoyed this post! Both are free and help the website grow. Thank you ♫
Thanks for reading,
-Jared


Learn how to build your own ultra low-noise microphone with EM272 capsules in this article!