How to Edit Field Recordings Efficiently
Editing gigabytes of recordings doesn’t have to be expensive or take forever. Read on to learn my time-saving techniques.

When I come home from field recording, I often have 5-10 tracks to edit. Usually, I’m dealing with 3-5 hours of audio from a day trip and 12+ hours for an overnight. Having this much audio to process can be overwhelming and certainly was for me when I first started this hobby.
Editing my audio was such a daunting task. I would frequently edit one recording, call it a day, and put the remaining raw recordings on the back burner for tomorrow. Well, tomorrow never came and I lost a lot of recordings to a hard drive failure.
I knew that I needed to simplify my processing techniques so that I could edit my recordings faster. I would like to share this streamlined process with you so that you can spend more time in the field and less time editing.
How to Process Field Recordings
Get it right the first time
Spectrogram shortcut
Minimal effects
Organization
Posting
Get it Right the First Time
This can be said for any recording device. Whether you’re recording audio, video or photographs, nailing your recording in the field is important. Not only will this save you time, it will also result in better quality audio.
I don’t know if the “perfect” recording exists, but there are factors you can control that will increase raw recording quality.
1. Gain: properly set gains will give you the largest dynamic range of sound. Quiet sounds are still audible and your main subject stays below 0 dB (no clipping). It takes practice to get this right. Over time, you will learn what gain gives you the best result in any given situation.
A general rule of thumb is to set your gain so that your main subject sits at -12 dB. This gives you headroom for “surprises” when things get closer or louder than you anticipated.
2. Balance: balance refers to how a stereo recording sounds. Correctly balancing your left and right channel audio in the field preserves the natural acoustics and limits the amount of post-production gain.
I use headphones in the field to find the best balance. I close my eyes and move my mics up and down, and then left to right. I slowly zero-in where the environment sounds the best (balanced) and start recording.
Slight changes can be made in post by adjusting the panning dial but you will have limited success trying to fix a very unbalanced recording. Large changes to balance will greatly decrease the volume of your sound. To bring the volume back up, digital gain is needed but this also raises the noise floor, lowering your sound quality.
3. Composition: some field recordings are simply more interesting than others. What most people don’t realize is that behind most “good” recordings is a talented artist who meticulously chose that location and direction to record in based on observations or experience. Take the time to get to know your environment and nature will reveal the best spot for your microphones.
See the below article for more detailed information on how to record the best-quality audio in the field.
Spectrogram Shortcut
A spectrogram is an essential tool in field recording processing. The spectrogram is the biggest time saver because it allows you to see sound. When you have hours of recordings to edit, this ability is priceless.
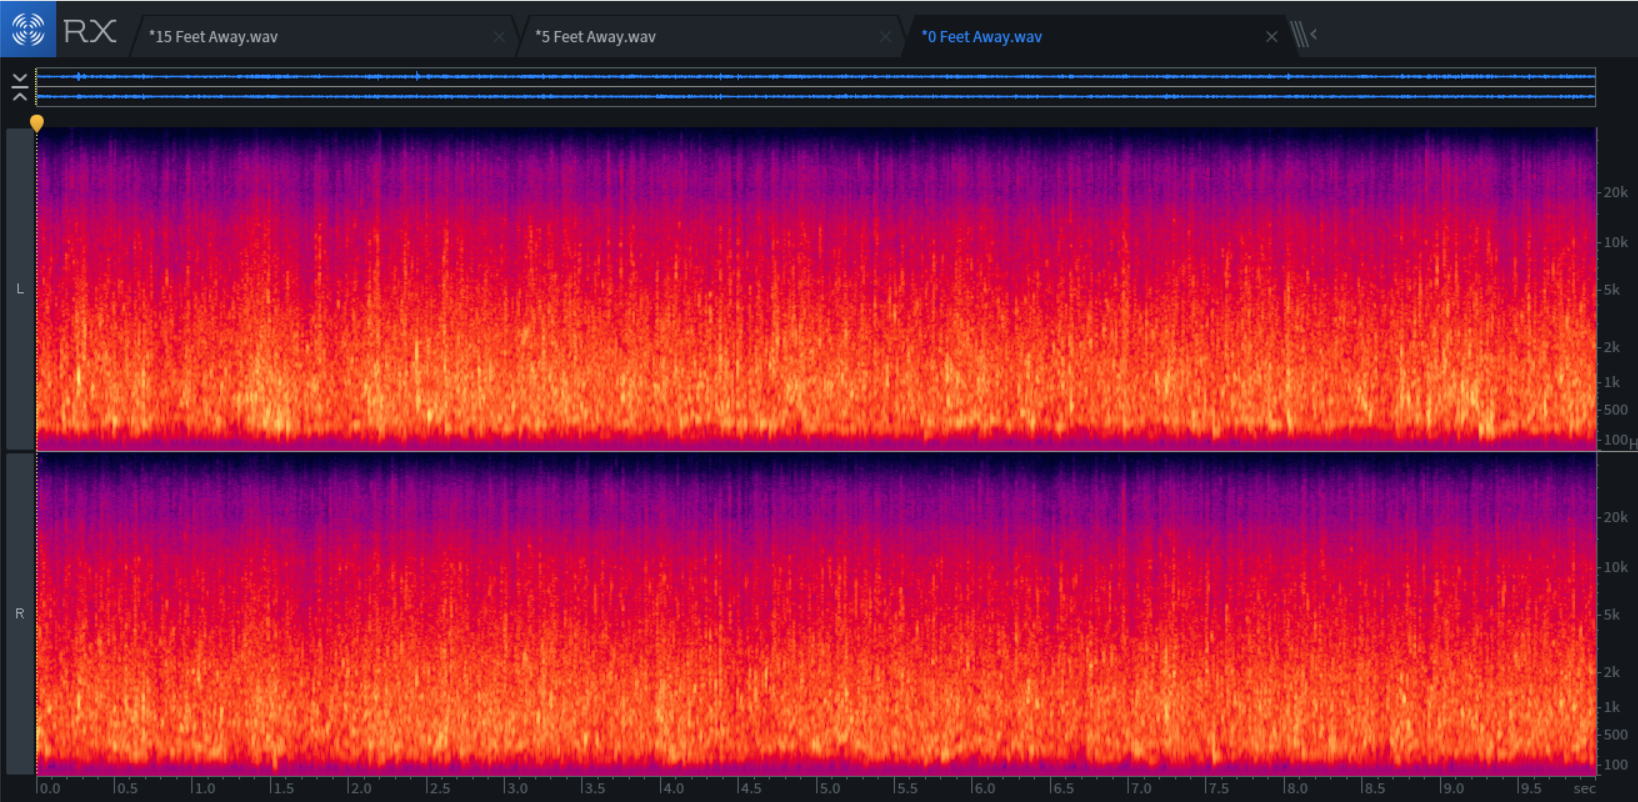
A spectrogram image of a close-up stream recording.
Spectrograms display audio as a color-coded graph. Frequency is on the y-axis and time is on the x-axis. The louder the recorded sound, the brighter it will be in the spectrogram.
At a glance, you will be able to tell where the most interesting sections of audio are, and where any noise pollution may be. After working with a recording for one minute, I can tell what the natural soundscape looks like and where the noise pollution is.
After deleting the sections of noise, I’m left with smaller chunks of audio. Because I don’t waste time listening to polluted audio, this saves me a ton of processing time.
Use Minimal Effects
If you’re new to field recording, you’ve probably heard about all kinds of fancy editing tools. De-wind, de-click, de-hum and other noise repair tools are advertised as essentials. I believed the hype and wasted a lot of time and money on such tools.
They never completely removed the problem and made new problems entirely. The technology is just not there yet. Every time I used processing tools for noise removal, my ears knew something was wrong.
Save yourself from these mistakes and keep your processing effects and tools to a minimum. If there is a noise you don’t like in your recording, either embrace it or cut it out entirely. Trying to salvage a long recording by masking noise interruptions is not worth your time.
With this simplified approach to my audio, the only tools I use now are de-hum, gain and fade.
Most microphones are more sensitive to lower frequencies than our ears are. They usually record tracks with a lot of rumbling that wasn’t audible in person. To fix this, I use a de-hum tool as a low frequency filter. If you don’t have a de-hum tool, an equalizer with a low-cut filter will work just as well.
I then use a gain tool to bring up the volume of the loudest peak to -2 dB.
Lastly, I use a fade tool to gently increase/decrease the volume over 15 to 30 seconds depending on the length of the recording.
All three of these tools are included in the Elements version of Izotope RX 7 for $129. You also get the full spectrogram feature for this price which is worth it alone.
I’ve worked with spectrograms in Audacity, Izotope and Sonic Visualizer. The Izotope spectrogram is by far the best.
Organization
Now that your sounds are processed, it’s time to export them…but where to put them?
Whether you’re creating a sound library for yourself, commercial purposes, or for sharing with friends, having an organized system for your sounds is important.
A good system will prevent you from losing, forgetting about, or wasting time searching for a recording.
I used to sort my recordings into genres: rain, water, birds, wind, etc. As my library grew, this system became too confusing. It was lacking a way to easily tell when and where a recording was from. I have revised this system and found a method that works for me. Below is how my hierarchical folder system works.
Field Recordings → Year → Location → File
For the location folder, I include the recording date in mo.dy.year format. This way, the folders automatically sort in chronological order. I use filenames that include the genre, description and length for detailed information at a glance.
This is the system that works for me. Feel free to try it for yourself or get creative and make a system that suits your needs better!
Posting

The last part to efficiently processing field recordings is to share your hard work! For me, that’s on SoundCloud. This doesn’t take that much time but can be difficult for some field recordists. We love being in the field so much, it can be tempting to capture new recordings instead of sitting down and posting old ones.
If you ever find yourself in this position, with a backlog of processed sounds needing uploading, it’s time for a posting day.
Now that I have such a streamlined editing process, I post most of my recordings on the same day I record them. However, I still acquire a backlog every once in a while and need to spend a day writing descriptions, tags and publishing sounds.
Conclusion
There are five keys to processing field recordings. Start by capturing the sound as close to perfect as possible in the field. Then, use a spectrogram to quickly find your best audio. Don’t waste your time or money trying to repair noise pollution; simply use a low-cut filter, increase the gain and add a fade-in and fade-out. Store your recordings in a hierarchical system.
That’s it! This system has worked well for me for the last two years. I hope you learned something that helped you!
Support Acoustic Nature
If you enjoyed this post and would like to help support Acoustic Nature, please consider "buying me a coffee" or becoming a Patreon with the buttons below.
As a thank you for your support, Patreon supporters receive a copy of Field Recording For Beginners, exclusive access to the full Behind The Sounds video series, nature sound library downloads, and more.
If you are unable to support the site financially, please share this post with others, or leave a comment below letting me know you enjoyed this post! Both are free and help the website grow. Thank you ♫
Thanks for reading,
-Jared