How To Set Field Recorder Gain (Setting Levels)
Learn how to set the best gain level quickly and properly in this beginner article!

How to properly set field recorder gain is one of the most commonly asked questions I receive from beginners just getting started in field recording.
This article will answer that question in full detail.
What is Gain?
In field recording, gain changes the volume of the audio entering the recording device.
Stated another way, gain is an adjustable setting that changes the volume of the input signal. The input signal is the audio being captured by the microphone.
This is an important distinction to make because changes to the audio volume exiting the device is simply a change in volume, not gain.
Gain settings typically range from 0 to 10. The higher the gain setting, the louder the input signal will be and vice versa.
How Does Gain Work?
Gain is controlled by the microphone preamplifier of the recording device.
Making adjustments to the gain setting tells the microphone preamplifier how much to boost the input signal’s volume.
The preamplifier does this electronically by applying more or less voltage to the input signal.
The Best Gain Setting
A lot of new field recordists believe that gain on a field recorder is a set-and-forget function; however, this is not the case.
Behind every field recording are many variables: volume of sound source, distance between microphone and sound source, unexpected sounds, microphone sensitivity, and even the specific recorder used all need to be accounted for.
Because of this, the “best gain setting” is a common misconception. In reality, the gain setting needs to be changed for every new recording for optimal audio quality.
This may sound overwhelming, but a simple method exists for properly setting the gain for any field recording.
How To Set Gain Properly
Luckily for field recordists, setting gain properly is an easy process that can be done in seconds. All one has to do is pay attention to the level meter.
Every field recorder has a level meter that is displayed while in standby or live recording modes. This meter displays the loudness of the input signal measured in decibels relative to full scale or dBFS.
dBFS measures audio amplitude levels in digital systems with a defined maximum peak level. For field recorders, the maximum peak level is 0 dBFS.
To properly set the gain for any field recording, simply adjust the gain control until the level meter is around -12dBFS.
Recording at this level will ensure that the recorded audio signal is loud enough for use and will not exceed 0dBFS.
Gain: Too High vs Too Low
Gain Too High
If the level meter indicates that the input signal is above -12dBFS, the gain is too high. If this is not corrected by lowering the gain setting, you run the risk of exceeding 0dBFS, resulting in distorted audio.
Most field recorders cannot record audio data above the 0dBFS threshold (32-bit recorders are an exception to this rule). When an audio signal exceeds this threshold, part of the sound is lost and results in clipping (distortion).
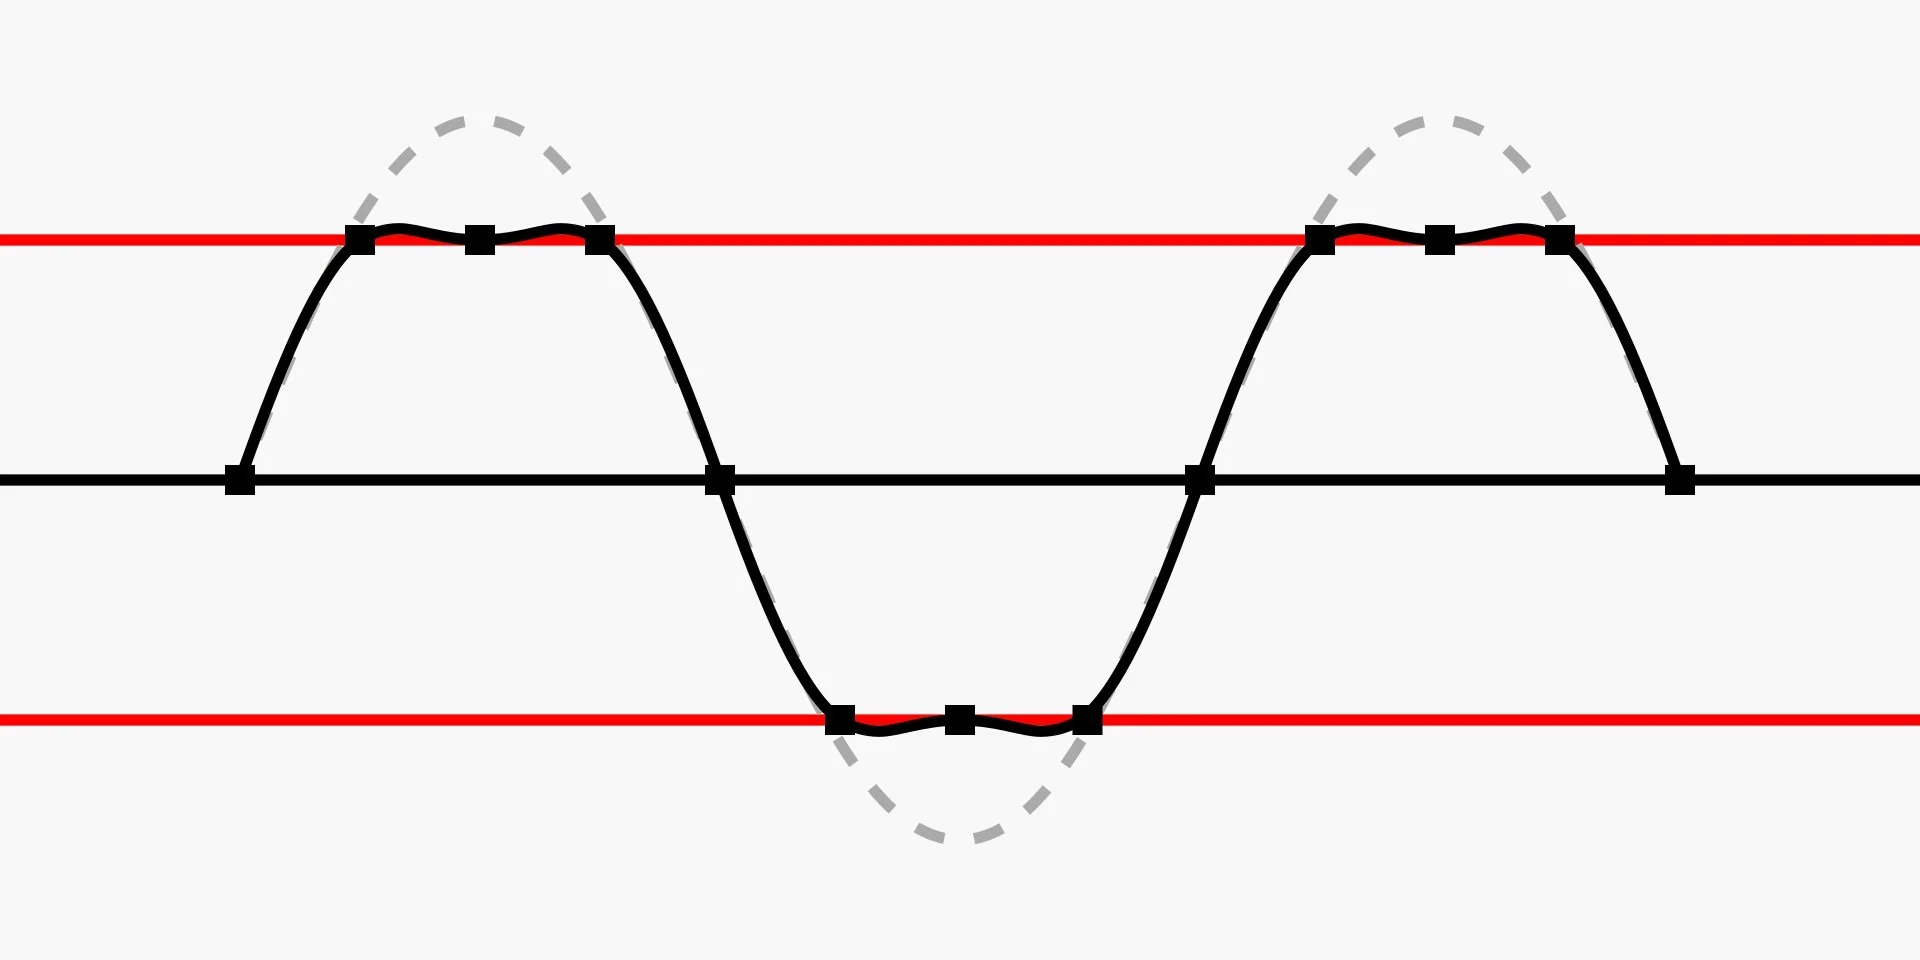
Example of a clipped audio waveform. The red lines represent the 0dBFS threshold. The dotted lines show the raw input signal and the black line shows the actual data that is recorded. The audio above the threshold cannot be recorded and is “clipped” and cannot be recovered.
In some cases, especially for guitars, the harmonics created by clipping is desired. This effect is commonly called distortion. However, it is best to record an unclipped signal so the producer has full creativity in post-production to add the desired amount of distortion.
Gain Too Low
On the other end of the spectrum, recording with too little gain is also undesirable.
If your gain setting is too low, your final recording may be too quiet to be usable. When listening back to the recording, you won’t be able to hear the full detail of the sound, even at maximum volume.
You may be thinking that this can be fixed by increasing the volume of the recording in post-production, but this also poses problems.
Increasing the volume in post-production will make the signal louder, but it will also make the noise louder. This has to do with the signal-to-noise ratio.
All field recorders have an inherit level of noise that they produce when powered. This noise sounds like hissing, white noise, similar to radio static. The signal-to-noise ratio measures the relationship in loudness of the signal (what you’re recording) to the noise produced by the recorder.
Increasing the gain setting will reduce the perceived noise since gain amplifies the input signal, thus increasing the signal-to-noise ratio and making the final recording sound cleaner.
Special Cases
In some cases, recording at -12dBFS is not ideal. The following are some of those cases:
recording sounds with a wide dynamic range
drop rig recordings
Wide Dynamic Range Sounds
Sounds with a wide dynamic range have inconsistent loudness levels. Examples include:
thunderstorms
live events
music
At times, these sounds can be very loud or very quiet. In order to capture this full range without clipping or distortion, gain should be set so that the loudest sounds peak around -12dBFS.
Drop Rig Recordings
Drop rig recordings are field recordings made with a microphone and recorder setup that is left unattended in the field. Drop rigs are most often used for recording the sounds of nature without interference or influence from humans being present.
Drop rigs are typically left running for 12 or more hours, or programmed to record within specific time frames. In either case, the recordist will not be physically present while the recording is taking place. This means that they will not be able to monitor the levels live and set the appropriate gain.
Additionally, when recording for such long periods of time, you don’t know exactly what will happen. A bird may land on your microphone and begin singing, a surprise rain shower may sweep across the landscape, or a tree may fall near by.
All of these sounds would produce extremely loud signals and may be distorted if the gain is set too high.
For this reason, setting gain levels for drop rig recordings is a bit of a gamble. You can set your gain to -12dBFS to record the general ambience at a usable level and risk distortion of any audio surprises, or you can set your optimistically low with hopes of capturing an up-close encounter with wildlife.
Other Ways To Change Gain
Microphone placement is another way to change gain.
The closer a microphone is to a sound source, the louder the input signal will be.
The relationship between microphone and sound source follows the Inverse-square law, which states that sound intensity increases as distance between the sound source and the microphone decreases.
This method of gain adjustment is useful for two scenarios:
Recording very loud signals that are still clipping with the minimum gain setting.
Recording a very quiet signals that are far below -12dBFS even at the maximum gain setting.
Final Thoughts
Setting the proper gain is relatively easy when following the -12dBFS rule, although there are some exceptions.
Recording sounds with a wide dynamic range can be challenging, especially when the loudest expected signal is unknown. For these circumstances, experience and trial-and-error is the best way to learn.
If you have any questions about gain or field recording in general, please feel free to contact me. Happy recording!
Support Acoustic Nature
If you enjoyed this post and would like to help support Acoustic Nature, please consider "buying me a coffee" or becoming a Patreon with the buttons below.
As a thank you for your support, Patreon supporters receive a copy of Field Recording For Beginners, exclusive access to the full Behind The Sounds video series, nature sound library downloads, and more.
If you are unable to support the site financially, please share this post with others, or leave a comment below letting me know you enjoyed this post! Both are free and help the website grow. Thank you ♫
Thanks for reading,
-Jared