Zoom M2, M3, M4 MicTrak | Prerelease Review
Learn everything we know about the new Zoom M-Series line so you can decide if one is for you!
On November 28th, 2022, Zoom announced their new M-Series line of field recorders.
The announcement adds three new field recorders to the Zoom lineup:
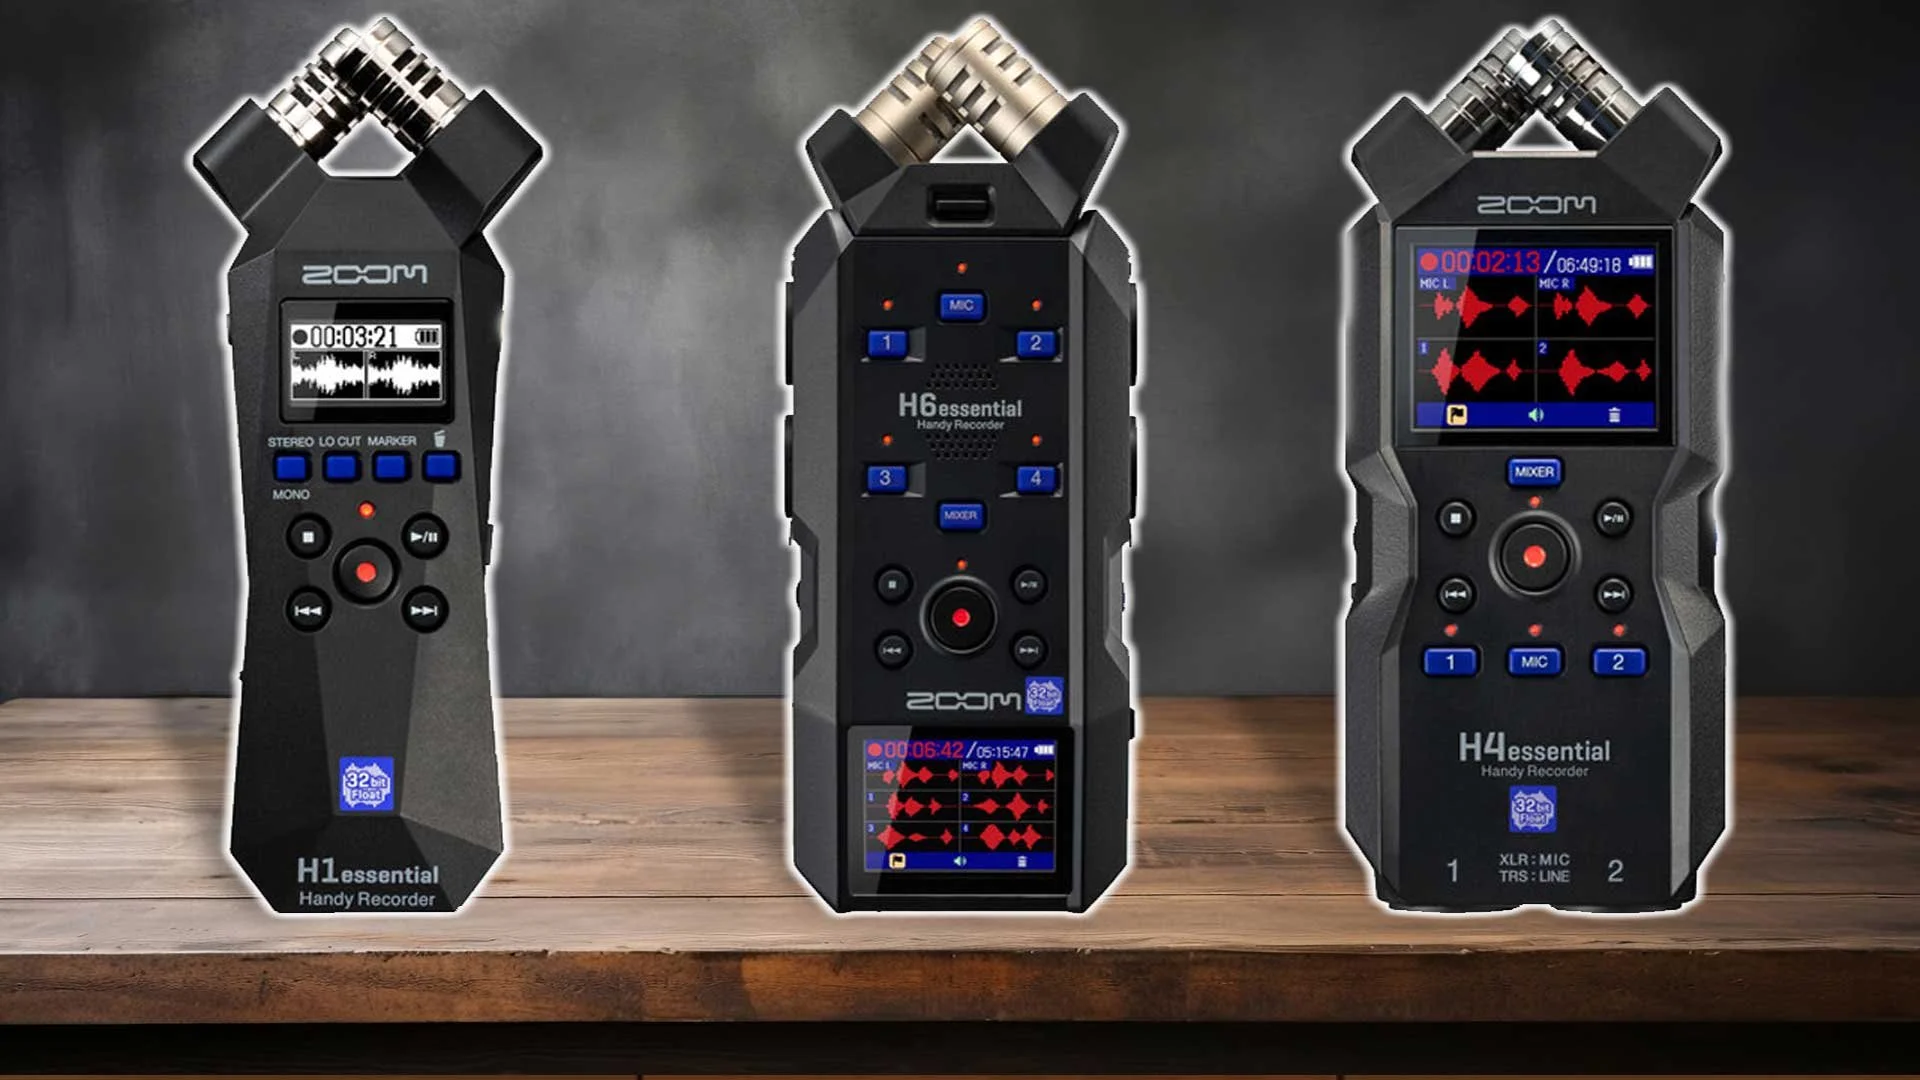
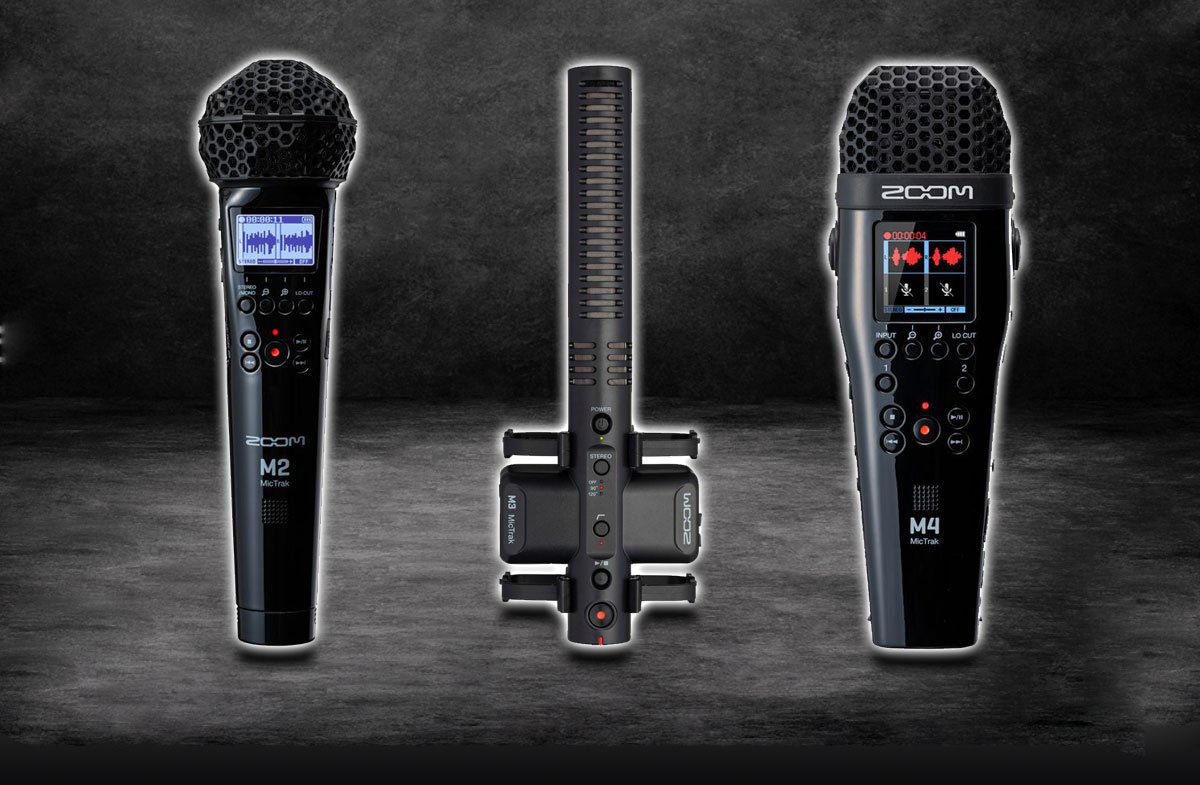
Zoom M2 - 32 bit float, portable field recorder with internal XY microphones.
Zoom M3 - 32 bit float, hot shoe mounted, mid-side shotgun microphone and recorder.
Zoom M4 - 32 bit float, portable field recorder with internal XY mics and x2 XLR inputs.
At the time of writing, the M-Series line is not yet available, although most retailers are accepting preorders.
In this post, we’ll have a look at each new field recorder; their features, best uses, and potential downsides.
Jump to review:
Table of Contents:
Purchase Links
Zoom M2 MicTrak
All-in-one, portable field recorder with 32-bit float. Great for journalists, interviews, and musicians.
Zoom M3 MicTrak
32-bit, all-in-one, shockmounted shotgun mic and recorder with hot shoe mount. Ideal for run & gun filmmakers.

Zoom M4 MicTrak
32-bit, all-in-one portable field recorder with x2 ultra low noise XLR preamps, and timecode. Built for professionals in any audio field.
Zoom M-Series Line
The new M-Series line of field recorders brings 32-bit float recording to beginner and budget friendly recordists (and also audio pros).
Previously, 32-bit float recording was only available in expensive, professional field recorders like the Sound Devices MixPre Series.
So what’s the big deal?
Clipped 24-bit vs. 32-bit float recordings after lowering gain in post. Notice how the 24-bit file remains clipped but the 32-bit float file perfectly recovers the data above 0 dBFS.
In a nutshell, 32-bit floating-point recording format is capable of capturing such a wide dynamic range, clipping is virtually impossible. This means that you do not have to set gain levels.
For 16 and 24-bit recordings, setting the optimal gain level that maximizes signal strength while staying below 0dBFS is a skill that can only be learned through practice (and even then is not foolproof).
Beginners especially struggle with setting gain levels, often making recordings that are so quiet they are not usable, or so loud that the audio distorts..
For them, the M-Series line of recorders helps make field recording more approachable and rewarding.
For professionals, 32-bit recording is a major timesaver and stress reducer. Not having to fiddle with gain knobs allows pros to spend more time on other important aspects of their job like rehearsing boom ques, testing wireless equipment, and checking in with their team.
Additionally, knowing that your audio will never clip during the shoot is a huge relief and one less thing to keep your eye on, resulting in better focus and performance.
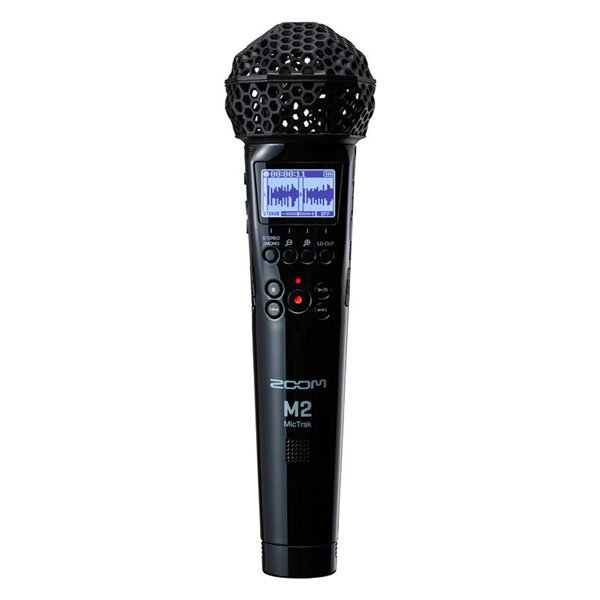
Zoom M2 MicTrak Review
The Zoom M2 MicTrak is a portable field recorder shaped like a traditional dynamic microphone.
With internal microphones, 32-bit float, an intuitive interface, and up to 96 kHz sampling rates, there’s a lot to like about this new device.
However, there’s also a lot not to like:
no 3.5mm line in
100% plastic
interference is an issue in urban environments with lots of RF noise
In this review of the M2 we’ll cover:
Zoom M2 Review Summary:
The Zoom M2 is an entry-level field recorder with 32-bit float support.
It's simple and intuitive to operate with a crisp LCD screen and dedicated buttons for frequently used settings.
However, handling noise, build quality, and RF interference are issues that must be weighed before purchasing.
Who Is the M2 For?

Similar to the Zoom H1n, the Zoom M2 MicTrak is built with beginners in mind, but is also a good option for journalists, interviewers, and musicians looking for a simple, reliable way to record audio.
The controls on the M2 are intuitive, with most common settings having their own dedicated buttons. This eliminates the need to dive into menus to change frequently used settings, making operation simple and efficient.
Controls with hardwired buttons/switches include:
stereo/mono recording mode
headphone volume
32-bit magnification
lo cut filter
hold switch
Having these settings accessible and in plain sight, it helpful for those new to audio, who may have difficulty navigating complex menu systems.
Build Quality
Build quality on the Zoom M2 MicTrak is not very good.
Featuring an all plastic build, the plastic feels cheap and is unlikely to provide any protection against drops and scratches.
The glossy finish, designed to help lower handling noise, makes the M2 slippery and not very secure when used with the included (also plastic) mic clip. Definitely don’t move your M2 around quickly or aggressively when attached to the mic clip, it will fall out.
Additionally, opting for a plastic body makes the M2 susceptible to RF interference, caused by nearby electronic devices emitting radio frequency waves (cell phones, WiFi routers, LED lights).
While it is possible to internally shield the electronics of a plastic bodied field recorder against RF interference, early tests of the M2 indicate that Zoom did not.
In the video below, Marcel from Free To Use Sounds shows the RF interference problem of the Zoom M2.
Inputs & Outputs
As the Zoom M2 MicTrak is a very simple field recorder, it has limited inputs and outputs.
Inputs:
The M2 only has one input; the internal XY microphones.
Zoom does not provide any specifications of the self-noise (typically a bad sign), and what specifications they do provide are disappointing.
The sensitivity of the internal microphone capsules is only -42dB. This is shockingly low and is comparable to some dynamic microphones that are ideal for recording extremely loud sounds like drums because of how insensitive they are.
For field recording purposes, low sensitivity microphones are not ideal for recording quieter sounds and will accentuate the hissing self-noise of the device.
It would have been really nice to see a stereo 3.5mm line input (as seen on the Zoom H1n), to give the M2 the option of using lavalier or low noise, plug-in-powered (PiP) microphones.
Outputs:
The Zoom M2 has three outputs:
Stereo headphone/line out
USB-C
Internal speaker
While the headphone out and internal speaker are nothing new, the USB-C out allows the M2 to be configured as a USB microphone for simple, 32-bit audio for streamers, gamers, podcasters, and content creators seeking live computer audio streaming or a streamlined workflow.
Size & Weight
The Zoom M2 MicTrak is very small, compact, and lightweight.
This makes sense, as it’s designed for handheld recordings and ease of use.
At 8” long and 2.4” wide at the bulbous microphone element, the M2 is small enough to fit into most pockets, convenient for journalists or interviewers.
Weighing in at 0.45 lbs, you’ll barely notice the M2 in hand, even during long interviews.
Handling Noise
Zoom has made several improvements to the M2’s design to help reduce handling noise including:
shockmounted XY microphones
specially designed glossy finish
However, in practice, it seems that these improvements have only mildly reduced handling noise.
In the video below, Marcel again demonstrates this drawback of the M2 MicTrak.
In addition to handling noise, the buttons on the M2 all produce clicking sounds that are clearly audible in the final recording.
So what real-world implications does this have?
If you plan to use the Zoom M2 handheld, be sure to have all of your settings dialed in before starting the recording, and use a firm, consistent grip.
Also, for journalists and interviewers, it’s probably best to hold the M2 for your guest, as they probably don’t know anything about audio and lack the trained grip required to reduce handling noise.
Power
The Zoom M2 is powered via two AA batteries. Run times for different battery types are listed below:
Alkaline batteries: 11 hours
NiMH batteries (1900 mAh): 10.5 hours
Lithium batteries: 22 hours
If these times are not sufficient for your work, the USB-C port can be used to bus power the M2 with a portable powerbank.
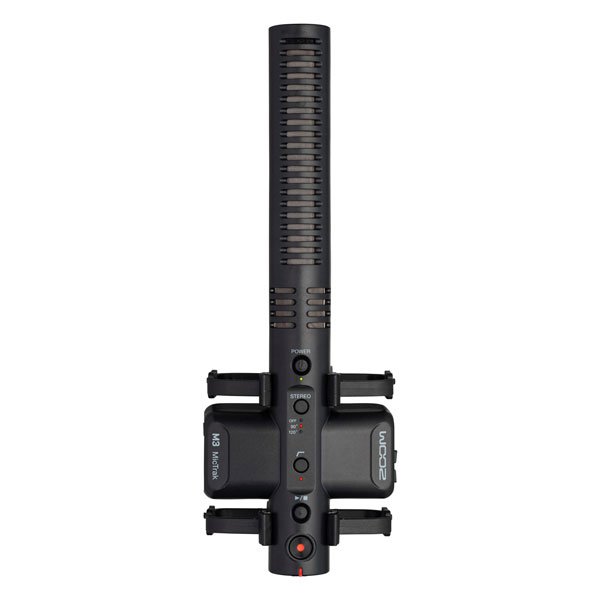
Zoom M3 MicTrak Review
The Zoom M3 MicTrak is a combination stereo shotgun microphone and 32-bit field recorder.
In this prerelease review of the M3 we’ll cover:
Affordably priced, the Zoom M3 is best suited for run & gun style filmmakers who need to capture
Zoom M3 Review Summary:
The Zoom M3 brings 32-bit audio to run-and-gun filmmakers in an affordable, lightweight, and simple package.
Every setting has a dedicated button; no menu or LCD screen for ease of use, including multiple stereo modes that take advantage of the dual, supercardioid and figure-8 microphones inside the M3.
Don't know what stereo mode to use? The M3 automatically records a backup mid-side raw file so you can adjust the stereo width in post-production.
Who The Zoom M3 Is For
The Zoom M3 is best suited for run & gun style filmmakers who need to quickly capture footage with high quality audio.
This filmmaking style is typically used to capture news footage and live events.
The M3 is best for this style thanks to its 32-bit float recordings, lightweight and shockmounted setup and hot shoe adapter for easily attaching to any camera.
With 32-bit float, there is no need to spend time setting gain levels. In fact, there is no gain control at all because it’s not needed.
Run & gun filmmakers can rest easy knowing that their audio will never clip or distort, and will always be at a usable volume.
After filming, you have the ability to raise or lower the audio volume in post-production, without introducing any noise to the recording.
32-bit float will also save you when surprising things happen while recording:
someone starts shouting when they previously were talking at a normal volume
the volume of your source suddenly becomes quiet
Stereo and Mono
The Zoom M3 features two internal microphones that can be switched on or off to alter the stereo image between mono, 90° stereo, and 120° stereo.
This is possible thanks to the internal supercardioid and figure-8 microphones.
Selecting a stereo mode is as simple as pressing the “stereo” button on the top of the M3. LED lights indicate what mode is selected.
mono is best suited for recording isolated dialog
90° stereo is best for capturing some of the ambient sounds around your subject
120° stereo is best for capturing entire ambiences or sound effects
Additionally, the M3 always saves a backup mid-side raw file to its internal microSD card, giving you the option to adjust stereo width in post-production.
Controls
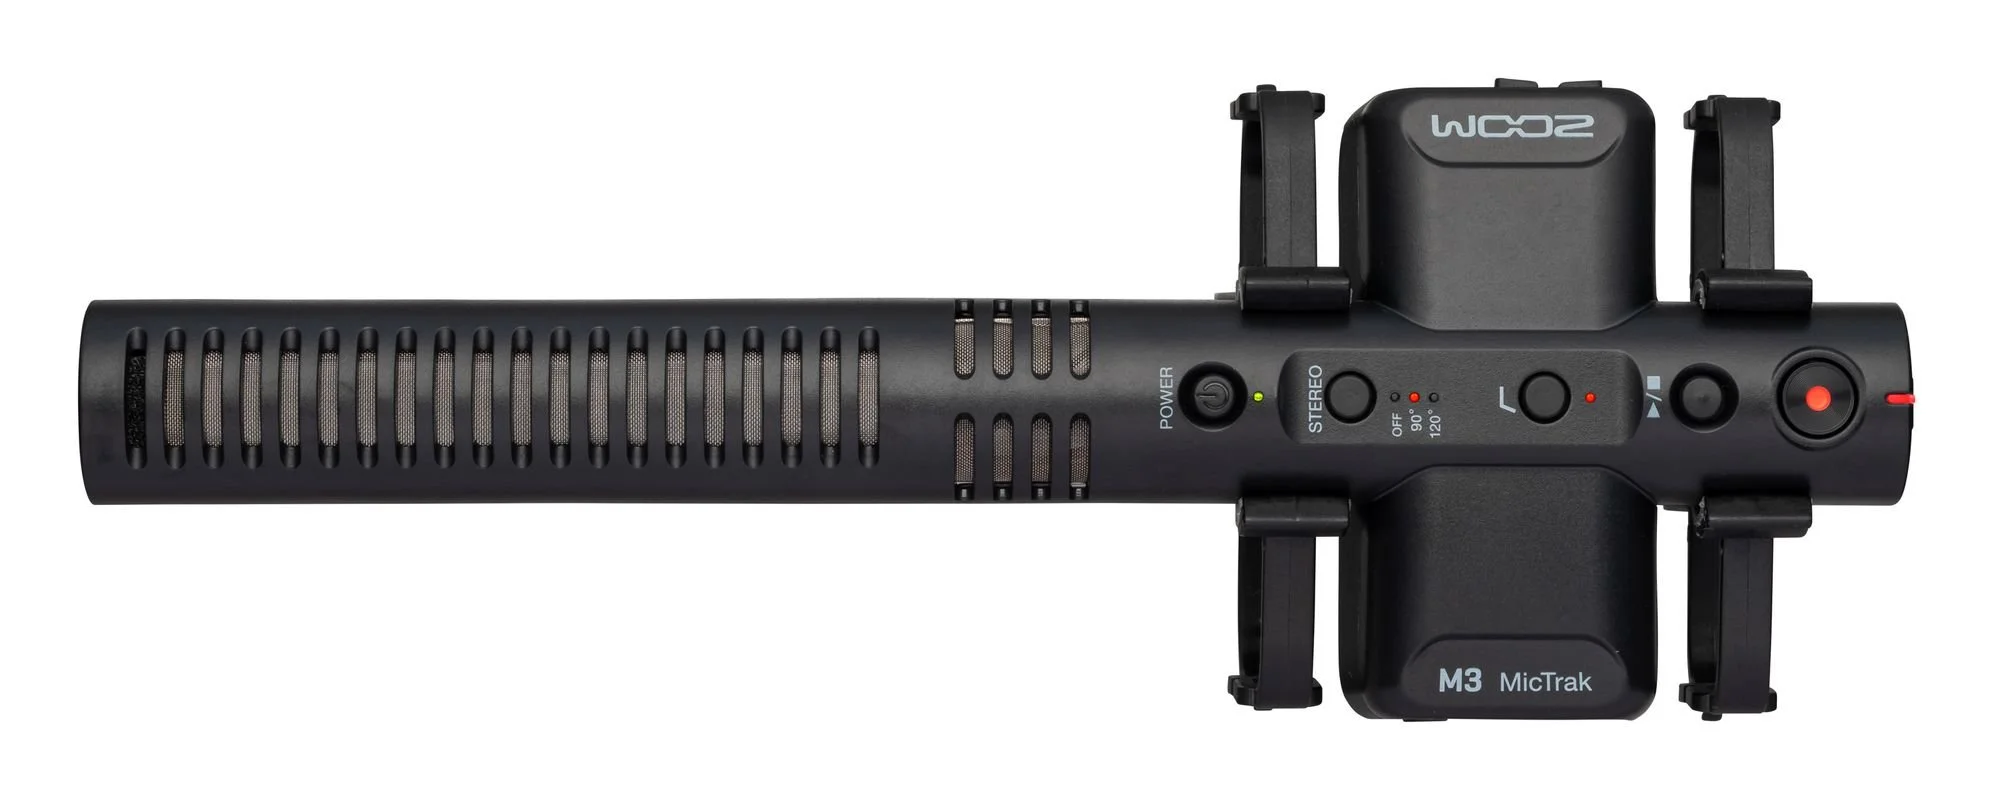
Controls on the Zoom M3 are all accessible via buttons. There is no LCD screen or internal menu.
Controls include:
stereo mode button - mono, 90° stereo, 120° stereo
headphone volume control
low cut filter button - “on” or “off” (120Hz)
playback controls
record button
Build Quality
As with the Zoom M2, build quality on the M3 is poor and entirely plastic.
This could indicate that the M3 is as susceptible to RF interference as the M2 is, but as the device is still in prerelease, this remains to be seen.
I would think (and hope) that Zoom would internally shield the electronic components of the M3 against RF noise, since filmmakers are often in environments with lots of radio frequencies, and video cameras are a source of RF noise themselves…
Power Options
The Zoom M3 runs on two AA batteries with run times for different battery types listed below:
Alkaline batteries: 12 hours
NiMH batteries (1900 mAh): 11 hours
Lithium batteries: 21 hours
For additional battery life, the M3 can be bus powered through its integrated USB-C port via a USB powerbank.
Zoom M4 MicTrak Review
The Zoom M4 MicTrak combines many pro-level features into an affordably priced 32-bit float recorder.
It features the same ultra low noise preamps seen on the professional F-Series line of recorders from Zoom yielding incredible sound quality of even the quietest sources.
In this prerelease review we’ll cover:
Zoom M3 Review Summary:
The Zoom M4 is an extremely capable field recorder built for professionals.
With 32-bit float recording, 192kHz sample rate, simultaneous recording of up to 4 channels, two ultra low noise XLR preamps, and a precise timecode generator, the M4 is a workhorse with pro-level features.
I only wish it was made of aluminum, not cheap plastic.
Timecode
The Zoom M4 is built for audio professionals. As such, the M4 features an internal timecode generator with the ability to input/output timecode metadata.
The timecode generator is high quality, precise to ±0.2 ppm. By using a high-precision oscillator, you’ll get accurate timecode with a discrepancy of less than 0.5 frames per 24 hours.
Timecode format is the industry standard, SMPTE, with support for 23.98/24/25/29.97/29.97DF/30 fps.
Build Quality
For a device clearly targeted toward audio professionals, the build quality of the Zoom M4 is poor.
The entire body and microphone grille are made out of cheap plastic, offering low durability and protection against drops and scratches.
Additionally, the plastic housing could make the M4 as susceptible to RF interference as the M2 if its internals are not properly shielded.
This remains to be seen as the M4 is still in prerelease and no one has been able to test one yet.
Inputs and Outputs
After the M2, it’s a relief to see many input and output options available on the M4.
Inputs:
Internal Microphones - fixed XY arrangement
3.5mm stereo mic input - for powering lavalier or PiP microphones
x2 XLR/TRS inputs - ultra low noise
The internal microphones on the M4 are the same, unimpressive capsules used in the M2. They are not very sensitive (-42dB) and are probably best for recording louder sounds like dialog.
The 3.5mm stereo mic input is a great feature and allows the M4 to be used with lavalier and ultra low noise plug-in-powered (PiP) microphones.
Perhaps the best feature of the M4 is its ultra low noise preamps. Featuring the same preamps as the Zoom’s professional F-Series line, the preamps on the M4 have a self noise rating of -127dBu. This is ultra quiet and near the theoretical threshold of what’s possible.
Outputs:
Line Out - 1/8” stereo mini jack
Headphone Out
Built-in Speaker
USB-C Out - limited to 48kHz sampling rate, 32 or 24-bit
Controls
The Zoom M4 features many settings via button controls, as well as a menu system.
Button controls include:
input selection - toggle between the internal microphones, input 1, and input 2. With an input selected, you can change on/off, low cut, phantom power voltage.
waveform magnification
low cut filter - OFF, 80Hz, 160Hz or 240Hz.
headphone volume
hold switch
adding track marks while recording - press the record button while recording
playback controls
In-menu settings include:
timecode mode - JAM, FPS, Reset, Internal, External
adjusting line output level - -48 to +24 dB
sample rate - 44.1/47.952/48/48.048/96/192kHz
prerecording - 6 second buffer up to 48kHz, 3 second buffer at 96kHz, 1 second buffer at 192kHz
normalization
time/date
display brightness
Power Options
The Zoom M4 runs on four AA batteries with run times for different battery types listed below (phantom power off):
Alkaline batteries: 19 hours
NiMH batteries (1900 mAh): 14.5 hours
Lithium batteries: 31 hours
Zoom does not provide battery life estimates with phantom power turned on, so you can be sure that it’s pretty low; otherwise they would advertise it.
For additional battery life while powering external condenser microphones, the M4 can be bus powered through its integrated USB-C port via a USB powerbank.
Support Acoustic Nature
If you enjoyed this post and would like to help support Acoustic Nature, please consider "buying me a coffee" or becoming a Patreon with the buttons below.
As a thank you for your support, Patreon supporters receive a copy of Field Recording For Beginners, exclusive access to the full Behind The Sounds video series, nature sound library downloads, and more.
If you are unable to support the site financially, please share this post with others, or leave a comment below letting me know you enjoyed this post! Both are free and help the website grow. Thank you ♫
Thanks for reading,
-Jared