Best Affordable Microphone for Recording Vocals
Top Budget Mics for High-Quality Vocal Recordings
Looking for the best affordable microphone for recording vocals can feel like searching for a needle in a haystack, especially with the myriad of options available today.
Whether you're a budding podcaster, an aspiring singer, or a seasoned musician on a budget, finding a microphone that offers quality sound without breaking the bank is essential.
In this guide, we'll delve into the top affordable microphones for vocal recording, exploring their features, pros, and cons to help you make an informed decision.
From dynamic to condenser mics, we've got you covered with options that deliver impressive performance at a wallet-friendly price.
Disclaimer: This blog post contains affiliate links. If you make a purchase through one of these links, I may receive a small commission at no additional cost to you. This helps support my work and allows me to continue providing valuable content. Thank you for your support!
Expert Advice:
When shopping for vocal mics on a budget, dynamic mics are the way to go.
Dynamic microphones are cheap, sound great, and aren’t as sensitive to background noise as condenser microphones.
This means you’ll get cleaner recordings in less than ideal recording conditions.
Additionally, dynamic mics are known for being nearly bullet-proof and will likely outlast any condenser microphone.
For these reasons, all the microphones in this post are dynamic and cost less than $100
Conversely, condenser microphones are expensive (cheap ones do exist but they’re cheap for a reason, extremely sensitive, and capture more high-frequency detail than dynamic microphones.
Planning on recording in an apartment with minimal acoustic treatment with loud neighbors, cars, birds, or barking dogs? Position your dynamic mic 1-2” away from your mouth to eliminate most of those unwanted sounds.
If you have a quiet recording studio with acoustic treatment, you may achieve better results with a condenser microphone.
Best Affordable Mics for Vocals
Best Budget
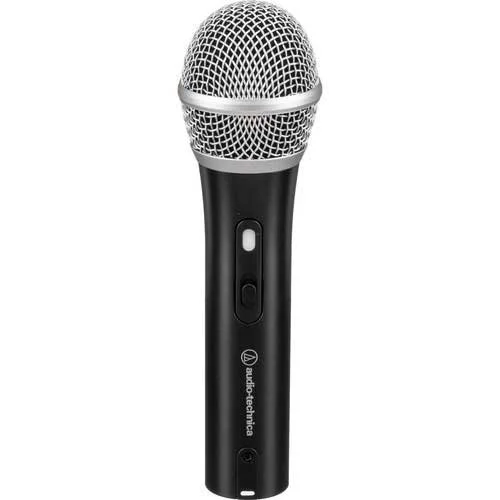
Audio Technica ATR2100X
Sounds great on a shoestring budget. USB plugs straight into your computer saving you from having to purchase additional accessories and cables.
Top-Pick
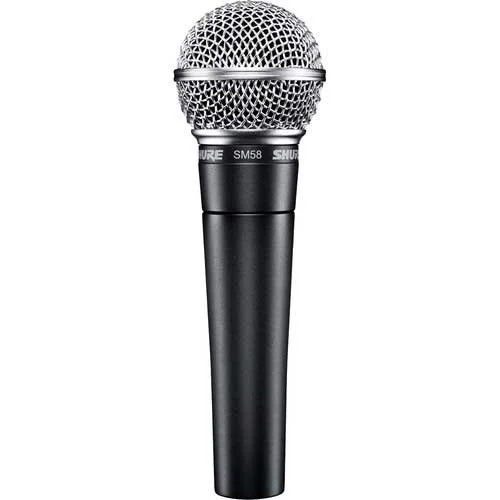
Shure SM58
Introduced in 1966, the SM58 is a legend in the audio industry for its durability, reliability, and quality sound. Used by Eminem, Beyonce, Paul McCartney, and more.
Alternate Option

Sennheiser E 835
A durable, dynamic cardioid microphone ideal for studio recordings, offering clear and natural vocal reproduction with minimal feedback and handling noise.
Buyer’s Guide
When it comes to recording vocals on a budget, dynamic microphones are a fantastic choice.
They are durable, versatile, and capable of delivering excellent sound quality without breaking the bank.
Here’s everything you need to know before purchasing an affordable dynamic microphone for recording vocals.
1. Microphone Types: Why Choose Dynamic?
Dynamic microphones are built to handle high sound pressure levels and are less sensitive to environmental noise.
This makes them ideal for both live performances and studio recordings, especially when working on a budget.
Their lower sensitivity results in cleaner recordings with less background noise, which is particularly beneficial in untreated environments.
This means you’ll pick up less of the ambient noise from neighbors, birds, dogs, and cars, allowing your vocals to stand out more clearly.
-
Dynamic microphones are a popular choice for a variety of applications, from live performances to studio recordings.
Understanding their unique characteristics can help you decide why they might be the best fit for your needs.
Here’s an in-depth look at why you should consider choosing a dynamic microphone.
1. Construction and Durability
Dynamic microphones are built to withstand harsh conditions and rough handling.
They use a relatively simple construction with a diaphragm attached to a coil of wire, placed within the magnetic field of a magnet.
When sound waves hit the diaphragm, it moves the coil, creating an electrical signal.
This rugged build makes them less susceptible to damage from drops, bumps, and exposure to high humidity and temperature fluctuations.
Advantages:
Robustness: Ideal for live performances and outdoor events where conditions can be unpredictable.
Longevity: Durable enough to last for many years, even with heavy use.
2. Sound Characteristics
Dynamic microphones are known for their ability to handle high sound pressure levels (SPL).
This makes them perfect for capturing loud sound sources without distortion.
They have a relatively limited frequency response compared to condenser microphones, which can be an advantage in certain situations.
Advantages:
High SPL Handling: Great for recording loud vocals, drums, and guitar amps.
Natural Sound: Provides a warmer, more rounded sound, which can be beneficial for certain vocal styles and instruments.
3. Lower Sensitivity
Dynamic microphones are less sensitive than their condenser counterparts.
This means they are better at rejecting ambient noise and focusing on the sound source directly in front of them.
This feature is particularly useful in untreated environments where background noise can be an issue.
Advantages:
Noise Rejection: Ideal for home studios and live settings with potential background noise from neighbors, street sounds, etc.
Focus: Captures the primary sound source clearly, reducing the need for extensive post-production noise reduction.
4. Cost-Effectiveness
Dynamic microphones are generally more affordable than condenser microphones, making them an excellent choice for beginners or those on a tight budget.
Despite their lower cost, many dynamic microphones deliver professional-quality sound that is suitable for both recording and live applications.
Advantages:
Affordable: High-quality options available at lower price points.
Value for Money: Excellent performance without the high cost.
5. Versatility
Dynamic microphones are versatile and can be used for a wide range of applications.
Whether you are recording vocals, amplifying instruments, or even miking drums, a dynamic microphone can handle the task efficiently.
This makes them a valuable addition to any audio toolkit.
Advantages:
Multi-Purpose: Suitable for vocals, instruments, and live sound.
Adaptable: Performs well in various environments and applications.
6. Polar Patterns
Dynamic microphones typically feature a cardioid polar pattern, which picks up sound primarily from the front and rejects sound from the sides and rear.
This pattern is effective in reducing feedback and isolating the sound source, making it ideal for live performances and recording in less-than-ideal acoustic environments.
Advantages:
Feedback Rejection: Minimizes feedback in live settings.
Isolation: Focuses on the sound source, reducing background noise.
2. Frequency Response
Look for a dynamic microphone with a frequency response tailored for vocals.
This typically means a presence boost in the mid-range (around 3kHz to 10kHz), which enhances clarity and allows the vocals to stand out in the mix.
A balanced frequency response ensures the microphone captures the full range of your voice without sounding too harsh or too dull.
-
What is Frequency Response?
Frequency response refers to the range of frequencies a microphone can reproduce and how it responds to each frequency within that range.
This is typically represented in a graph called a frequency response curve, which shows how a microphone's output varies across different frequencies.
The x-axis represents frequency (measured in Hertz), while the y-axis represents amplitude or sensitivity (measured in decibels).
Why Frequency Response Matters
The frequency response of a microphone directly impacts the tonal characteristics of the sound it captures.
Different microphones have different frequency responses, making them more or less suitable for specific applications.
Key Points:
Range: A wider frequency response range means the microphone can capture more details, from deep bass to high treble.
Shape: The shape of the frequency response curve indicates which frequencies are emphasized or de-emphasized. This helps determine the microphone's suitability for various types of recordings.
Types of Frequency Response Curves
Flat Response
Description: A flat frequency response means the microphone captures all frequencies equally, without boosting or attenuating any part of the spectrum.
Applications: Ideal for recording acoustic instruments, orchestras, or any situation where a natural and accurate sound reproduction is desired.
Example: Measurement microphones often have a flat response to ensure precise sound reproduction.
Shaped Response
Description: A shaped frequency response means the microphone boosts or cuts certain frequencies. This can enhance specific characteristics of the sound.
Applications: Common in vocal microphones, where a presence boost (usually around 3kHz to 10kHz) enhances clarity and intelligibility.
Example: Many vocal microphones have a presence peak to help vocals cut through a mix.
Key Frequency Ranges
Understanding the specific frequency ranges can help you select a microphone that best suits your needs:
Sub-Bass (20Hz - 60Hz): Often felt more than heard, important for capturing the rumble of low-end instruments like bass guitars and kick drums.
Bass (60Hz - 250Hz): Adds fullness and warmth to recordings, crucial for low-end instruments and male vocals.
Low Midrange (250Hz - 500Hz): Essential for the body of most instruments and vocals. Too much emphasis can make the sound muddy.
Midrange (500Hz - 2kHz): Critical for the clarity and presence of most instruments and vocals. This range is where human hearing is most sensitive.
Upper Midrange (2kHz - 4kHz): Enhances the presence and intelligibility of vocals and instruments. A boost in this range helps vocals stand out.
Presence (4kHz - 6kHz): Affects the clarity and definition of the sound. Presence boosts help vocals and lead instruments cut through a mix.
Brilliance (6kHz - 20kHz): Adds air and sparkle to recordings. Important for capturing the nuances of cymbals and providing a sense of space.
Practical Applications
Vocals
For recording vocals, a microphone with a presence boost in the upper midrange and presence ranges (around 3kHz to 10kHz) is often preferred. This enhances clarity and allows the vocals to stand out in the mix without sounding harsh.
Instruments
Acoustic Guitars: A flat or slightly shaped response can help capture the natural sound of the instrument.
Electric Guitars: Microphones with a midrange boost can help capture the crunch and detail of the guitar amp.
Drums: Different microphones with tailored responses for kick drums, snare drums, and cymbals can enhance the specific characteristics of each part of the drum kit.
Analyzing Frequency Response Charts
When looking at a frequency response chart:
Flat Lines: Indicate a consistent response across frequencies.
Peaks: Show frequencies that are boosted.
Dips: Indicate frequencies that are attenuated.
3. Polar Patterns
Most dynamic microphones designed for vocal use feature a cardioid polar pattern.
This pattern is highly effective at isolating the sound source (your voice) and minimizing background noise and feedback.
The cardioid pattern picks up sound primarily from the front, providing good rejection of sounds from the sides and rear.
-
Polar patterns are critical characteristics of microphones that describe how they pick up sound from different directions.
Knowing about these patterns can help you choose the right microphone for your specific needs, whether it's for recording vocals, instruments, or conducting interviews.
This guide provides an in-depth look at various polar patterns and their applications.
What Are Polar Patterns?
Polar patterns, also known as pickup patterns, illustrate the microphone's sensitivity to sound from various directions.
They are typically represented as 2D graphs that show the microphone's response to sound at different angles around it. Here are the main types of polar patterns:
1. Cardioid Polar Pattern
Shape and Characteristics:
Description: The cardioid pattern resembles a heart shape (hence the name "cardioid"), picking up sound primarily from the front while rejecting sound from the sides and rear.
Angle of Sensitivity: Maximum sensitivity at 0° (front), reduced sensitivity at ±90° (sides), and minimum sensitivity at 180° (rear).
Applications:
Vocals: Ideal for vocal recording and live performances as it isolates the voice from background noise.
Instruments: Used for close-miking instruments to reduce bleed from other sound sources.
Live Sound: Minimizes feedback by rejecting sound from stage monitors.
2. Supercardioid and Hypercardioid Polar Patterns
Shape and Characteristics:
Description: These patterns are more directional than cardioid, with a narrower pickup angle and greater rejection of sound from the sides. They have a small lobe of sensitivity at the rear.
Angle of Sensitivity: Maximum sensitivity at 0°, reduced sensitivity at ±60° to ±70° for supercardioid and ±55° to ±65° for hypercardioid, with a small lobe at 180°.
Applications:
Film and TV: Ideal for capturing dialogue in noisy environments.
Live Sound: Used in live sound reinforcement to control feedback and capture sound from specific sources on stage.
Interviewing: Useful in noisy environments to isolate the interviewee’s voice.
3. Omnidirectional Polar Pattern
Shape and Characteristics:
Description: This pattern picks up sound equally from all directions (360°). There is no distinction between the front, sides, or rear of the microphone.
Angle of Sensitivity: Equal sensitivity at all angles.
Applications:
Room Ambience: Capturing the natural reverb and ambience of a room.
Group Vocals: Recording choirs or group vocals where uniform pickup is desired.
Field Recording: Capturing environmental sounds for film or nature recordings.
4. Bidirectional (Figure-8) Polar Pattern
Shape and Characteristics:
Description: This pattern captures sound equally from the front and rear while rejecting sound from the sides. The graph looks like a figure-8.
Angle of Sensitivity: Maximum sensitivity at 0° and 180°, with null points at ±90°.
Applications:
Duet Recording: Ideal for recording two vocalists facing each other.
Mid-Side (M-S) Stereo Recording: Used in stereo recording techniques to capture a wider soundstage.
Interviewing: Great for interviews where the interviewer and interviewee are on opposite sides of the microphone.
5. Shotgun Polar Pattern
Shape and Characteristics:
Description: Extremely directional with a very narrow pickup angle, rejecting most sounds from the sides and rear. This pattern is achieved through interference tube technology.
Angle of Sensitivity: Maximum sensitivity at 0°, with significant rejection at ±90° and rear.
Applications:
Film and TV: Capturing dialogue from a distance in noisy environments.
Sports Broadcasting: Isolating commentary or specific sounds from the crowd noise.
Wildlife Recording: Recording specific animal sounds in natural settings.
How to Choose the Right Polar Pattern
Choosing the right polar pattern depends on your specific recording needs:
Isolate a single sound source in a noisy environment? Use cardioid, supercardioid, or hypercardioid.
Capture natural room ambience or multiple sound sources? Use omnidirectional.
Record two sources from opposite directions or use stereo recording techniques? Use bidirectional (figure-8).
Capture distant sound sources in noisy environments? Use shotgun.
Understanding these characteristics will help you select the best microphone for your recording situation, ensuring you get the best possible sound quality.
4. Sensitivity and SPL Handling
Sensitivity: Dynamic microphones generally have lower sensitivity compared to condenser mics. This means they are great at rejecting unwanted ambient noise and handling loud vocals without distortion.
Sound Pressure Level (SPL): A high SPL handling capability is essential for recording powerful vocal performances. Dynamic microphones can typically handle high SPLs, making them suitable for recording everything from soft vocals to loud, energetic performances.
-
When choosing a microphone, two critical factors to consider are sensitivity and handling noise.
These characteristics can significantly impact the quality and usability of the microphone in various recording and live sound environments.
This guide provides an in-depth look at sensitivity and handling noise, helping you make an informed decision.
Sensitivity
Definition: Sensitivity, in the context of microphones, refers to how effectively a microphone converts acoustic sound into an electrical signal.
It is typically measured in millivolts per Pascal (mV/Pa) or decibels relative to 1 volt per Pascal (dB re 1V/Pa).
High Sensitivity:
Advantages: High-sensitivity microphones can capture very quiet sounds without requiring a significant boost in gain. This makes them ideal for studio environments where capturing subtle nuances and details is essential.
Applications: Studio recording of vocals, acoustic instruments, and ambient sounds.
Examples: Condenser microphones often have higher sensitivity compared to dynamic microphones, making them more suitable for capturing detailed audio in controlled environments.
Low Sensitivity:
Advantages: Low-sensitivity microphones are less likely to pick up unwanted ambient noise, making them ideal for live performances and recording in untreated rooms.
They can handle higher sound pressure levels (SPL) without distorting.
Applications: Live sound reinforcement, close-miking of loud sound sources such as drums and guitar amplifiers.
Examples: Dynamic microphones typically have lower sensitivity, which helps in isolating the intended sound source while rejecting background noise .
Factors Affecting Sensitivity:
Microphone Type: Condenser microphones generally have higher sensitivity than dynamic microphones due to their different transducer mechanisms.
Diaphragm Size: Larger diaphragms can capture more sound energy, often resulting in higher sensitivity.
Preamp Quality: Built-in preamps in condenser microphones can boost sensitivity.
Handling Noise
Definition: Handling noise refers to the unwanted sound picked up by a microphone when it is physically handled or moved. This can include noises from the microphone body, cable, or stand being touched or bumped.
Causes of Handling Noise:
Physical Movement: Vibrations or impacts transmitted through the microphone stand or handheld movements.
Construction Material: The materials used in the microphone's construction can either dampen or amplify handling noise.
Internal Components: Loose or poorly secured internal components can contribute to handling noise (Home Recording Lab) (Sennheiser).
Minimizing Handling Noise:
Shock Mounts: Using a shock mount can isolate the microphone from vibrations transmitted through the stand or mount.
Internal Shock Absorption: Some microphones have built-in shock absorption systems that help reduce handling noise.
Proper Handling Techniques: Educating users on proper handling techniques can significantly reduce handling noise.
Holding the microphone by its body and avoiding unnecessary movements can help.
Applications and Considerations:
Live Performances: Handling noise can be particularly problematic in live settings where microphones are frequently moved.
Choosing a microphone with good handling noise isolation is crucial for maintaining sound quality.
Studio Recording: In the studio, handling noise can still be an issue, especially for vocalists who move around while singing.
Selecting a microphone with effective noise rejection features can help maintain recording clarity.
Practical Tips for Managing Sensitivity and Handling Noise
Select the Right Microphone: Choose a microphone with the appropriate sensitivity for your application.
For quiet, detailed recordings, opt for a high-sensitivity condenser microphone.
For loud environments or live sound, a low-sensitivity dynamic microphone is preferable.
Use Accessories: Utilize shock mounts, pop filters, and windshields to minimize handling noise and protect the microphone from plosive sounds.
Optimize Placement: Proper microphone placement can help reduce unwanted noise. Position the microphone to capture the sound source directly while minimizing exposure to background noise.
Educate Users: Train performers and technicians on proper microphone handling techniques to reduce noise. Simple practices like avoiding tapping or gripping the microphone grille can make a significant difference.
Consider Environmental Factors: Be aware of the recording environment and try to control external noise sources as much as possible. In untreated environments, using a low-sensitivity microphone can help mitigate the impact of background noise.
5. Durability
Dynamic microphones are renowned for their rugged construction.
Look for models with metal housings and internal shock mounts to ensure they can withstand the rigors of both studio and live environments.
Their robust design makes them a reliable choice for musicians who need a microphone that can take a beating and keep on working.
-
Durability is a crucial factor to consider when selecting a microphone, especially for those frequently used in demanding environments like live performances, touring, and field recordings.
This guide delves into what makes a microphone durable, the materials and construction methods that enhance durability, and how to choose a microphone that will stand the test of time.
Key Components of Microphone Durability
1. Construction Materials
The materials used in the construction of a microphone significantly affect its durability. Common materials include:
Metal Housings: Many high-quality microphones use metal housings, such as steel or aluminum, which provide robustness and resistance to physical damage. Metal housings are less likely to crack or break upon impact.
Grilles: The grille protects the microphone’s diaphragm from physical damage and wind noise. Metal grilles, especially those made from steel mesh, offer superior protection compared to plastic ones.
2. Internal Shock Mounts
Internal shock mounts help isolate the microphone capsule from mechanical vibrations and handling noise. These mounts are typically made from rubber or other flexible materials that absorb shocks and impacts, preventing them from reaching the sensitive internal components.
3. Weather Resistance
For microphones used in outdoor or harsh environments, weather resistance is an important feature. Some microphones are designed to withstand moisture, temperature extremes, and dust. Look for models with IP (Ingress Protection) ratings that indicate their resistance to environmental factors.
Factors Enhancing Microphone Durability
1. Rugged Design
Microphones designed for durability often have a rugged design that includes reinforced bodies, durable connectors, and robust internal components. These designs are intended to withstand rough handling, drops, and other physical stresses typical in live sound environments.
2. Maintenance and Care
Regular maintenance and proper care can significantly extend the life of a microphone. This includes cleaning the grille, avoiding exposure to extreme conditions when not necessary, and storing the microphone in a protective case when not in use.
Selecting a Durable Microphone
When selecting a durable microphone, consider the following:
Intended Use: Determine whether the microphone will be used primarily in live settings, studios, or field recording. Each environment places different demands on the microphone’s durability.
Build Quality: Check the build quality, including the materials used for the housing and grille, the presence of internal shock mounts, and the overall design robustness.
Brand Reputation: Brands known for their durable microphones include Shure, Sennheiser, and Rode. These manufacturers have a long history of producing reliable and rugged microphones.
6. Handling Noise and Feedback Rejection
Quality dynamic microphones often include features that minimize handling noise and feedback.
Internal shock mounts can reduce the transmission of mechanical noise from handling the microphone, while the cardioid polar pattern helps to reject feedback from stage monitors and other sources.
-
Feedback rejection is a critical characteristic of microphones, especially in live sound environments.
Feedback, the high-pitched squeal or hum that occurs when a microphone picks up sound from its own output, can ruin a performance or recording session.
This guide explains what feedback is, how it occurs, and the techniques and microphone features that help reject feedback.
What is Feedback?
Definition: Audio feedback is a looped signal that occurs when a microphone captures sound from a loudspeaker, which is then amplified and re-captured by the microphone.
This creates a continuous loop that results in the characteristic screeching noise.
How Feedback Occurs
Mechanism: Feedback typically happens when the sound from the speakers re-enters the microphone, is amplified again, and then exits through the speakers, creating a cycle.
This loop can quickly escalate in volume, leading to the disruptive noise known as feedback.
Factors Contributing to Feedback:
Microphone and Speaker Placement: If microphones are placed too close to or directly facing speakers, feedback is more likely to occur.
Gain Levels: High gain settings can increase the risk of feedback as they amplify all sounds, including those from the speakers.
Room Acoustics: Reflective surfaces can cause sound to bounce back into the microphone, increasing the chances of feedback.
Techniques for Feedback Rejection
1. Microphone Polar Patterns
Polar patterns describe how microphones pick up sound from different directions, and some are better at rejecting feedback than others.
Cardioid: These microphones pick up sound primarily from the front and reject sound from the rear, making them effective for reducing feedback in most live sound settings.
Supercardioid and Hypercardioid: These patterns have narrower pickup angles and greater rear rejection compared to cardioid microphones. They provide even better feedback rejection but are more sensitive to sound directly behind them.
Bidirectional (Figure-8): These pick up sound from the front and rear while rejecting sound from the sides, making them less ideal for feedback rejection in typical live sound setups.
2. Proper Microphone and Speaker Placement
Microphone Placement: Position microphones away from speakers and avoid pointing them directly at speakers. Place the microphone in such a way that it picks up the sound source clearly while minimizing the potential for sound from the speakers to be captured.
Speaker Placement: Aim speakers away from the microphone to reduce the chances of sound re-entering the mic. Using floor monitors instead of overhead speakers can also help control feedback.
3. Use of Equalizers and Feedback Suppressors
Equalizers: Adjusting the equalizer settings on your mixing console can help reduce the frequencies that are prone to feedback. This often involves cutting the mid-range frequencies where feedback is most likely to occur.
Feedback Suppressors: These devices automatically detect and attenuate the frequencies that cause feedback. They can be very effective in live sound applications where manual EQ adjustments might be impractical.
4. Proper Gain Structure
Setting the correct gain levels is crucial in preventing feedback. Start by setting the microphone gain just high enough to capture the desired sound without picking up excess noise.
Gradually increase the volume of the speakers, ensuring that the system remains stable and free from feedback.
Microphone Features that Enhance Feedback Rejection
Internal Shock Mounts: These help isolate the microphone capsule from mechanical vibrations and handling noise, which can otherwise contribute to feedback.
Wind and Pop Filters: These accessories can help reduce plosive sounds and breath noises that might contribute to feedback in certain scenarios.
Directional Sensitivity: Microphones with enhanced directional sensitivity are designed to pick up sound from specific directions while rejecting off-axis sounds. This feature is particularly useful in live sound environments to reduce feedback.
7. Compatibility and Accessories
Ensure the microphone you choose is compatible with your existing audio interface or mixer.
Additionally, consider any necessary accessories such as pop filters, windshields, and microphone stands.
These accessories can enhance your recording experience and improve the overall sound quality.
-
Choosing the right microphone involves more than just considering its technical specifications.
Ensuring compatibility with your recording equipment and having the right accessories can significantly enhance your audio quality and ease of use.
This guide delves into the critical aspects of microphone compatibility and the essential accessories you need for optimal performance.
Compatibility
1. Audio Interfaces and Mixers
Microphones need to be compatible with your audio interface or mixer to ensure proper signal transfer and sound quality.
Connection Types: Most professional microphones use XLR connectors, which provide a balanced audio signal and reduce noise interference. Ensure your audio interface or mixer has XLR inputs.
Phantom Power: Condenser microphones require phantom power (usually +48V) to operate. Ensure your audio interface or mixer can supply phantom power if you choose a condenser microphone.
Impedance Matching: Check the impedance levels of your microphone and audio interface or mixer. Mismatched impedance can result in poor audio quality. Most modern equipment handles this well, but it's still worth verifying.
2. Computer and Software Compatibility
Ensure your computer and recording software are compatible with your microphone setup.
Drivers and Software: Some audio interfaces require specific drivers to function correctly. Check for compatibility with your operating system (Windows, macOS, etc.).
DAW Integration: Your digital audio workstation (DAW) should seamlessly integrate with your audio interface and microphone. Popular DAWs like Pro Tools, Logic Pro, Ableton Live, and others generally support a wide range of hardware, but always double-check compatibility.
3. Cable Requirements
The quality and type of cables used can impact the performance of your microphone setup.
Balanced vs. Unbalanced Cables: Balanced cables (XLR) are preferred for professional audio as they reduce noise and interference. Unbalanced cables (TS or RCA) are more susceptible to noise and are generally not recommended for long cable runs.
Cable Length: Use cables that are long enough to reach your equipment without stretching but not so long that they introduce significant signal degradation.
Essential Accessories
1. Pop Filters
Pop filters are crucial for reducing plosive sounds (e.g., "p" and "b" sounds) that can cause distortion and unwanted noise in vocal recordings.
Types: Nylon and metal mesh pop filters are common. Nylon filters are more affordable, while metal filters are more durable and easier to clean.
Mounting: Ensure the pop filter can be easily attached to your microphone stand and positioned correctly between the vocalist and the microphone.
2. Shock Mounts
Shock mounts isolate the microphone from mechanical vibrations and handling noise, providing cleaner recordings.
Compatibility: Make sure the shock mount is compatible with your microphone model. Some microphones come with proprietary shock mounts.
Adjustability: Look for shock mounts that allow for easy adjustment and secure attachment to your microphone stand.
3. Microphone Stands
A sturdy microphone stand is essential for positioning your microphone correctly and securely.
Types: Boom stands offer greater flexibility in positioning, while straight stands are simpler and more stable for stationary use.
Height and Stability: Ensure the stand can reach the desired height and remain stable, especially when using heavier microphones or accessories like pop filters and shock mounts.
4. Windscreens
Windscreens protect microphones from wind noise and breath sounds, which is particularly useful for outdoor recordings.
Foam Windscreens: Effective for reducing wind noise in light to moderate wind conditions.
Furry Windscreens (Deadcats): Provide superior wind protection for outdoor use, especially in strong wind conditions.
5. Carrying Cases
A good carrying case protects your microphone and accessories during transport.
Padding: Look for cases with adequate padding to protect against shocks and drops.
Compartments: Compartments for cables, mounts, and other accessories can help keep everything organized.
8. Budget Considerations
Dynamic microphones are typically more affordable than condenser mics, but prices can still vary.
Prioritize features that are most important to your needs, such as durability, sound quality, and feedback rejection.
You can find high-quality dynamic microphones at various price points, so there’s no need to compromise on essential features.
-
Selecting the right microphone within a budget involves understanding various factors that influence price and determining which features are essential for your needs.
This guide provides a comprehensive look at how to navigate budget considerations when purchasing a microphone.
1. Understand Your Needs
Before diving into the specifics of microphone pricing, it's crucial to assess your requirements:
Application: Determine whether the microphone will be used for live performances, studio recordings, podcasting, or field recordings. Different applications may require different types of microphones.
Sound Quality: Identify the level of sound quality you need. For professional studio recordings, investing in higher-end microphones may be necessary, while more affordable options can suffice for basic applications.
Environment: Consider the environment in which you will use the microphone. Untreated rooms might require microphones with better noise rejection, while controlled studio environments offer more flexibility.
2. Types of Microphones and Price Ranges
Understanding the different types of microphones and their typical price ranges can help you make an informed decision.
Dynamic Microphones: Generally more affordable and durable, making them ideal for live performances and high-SPL environments. Prices typically range from $50 to $200.
Condenser Microphones: Offer higher sensitivity and a wider frequency response, making them suitable for studio recordings. Entry-level condenser mics can start at $100, while professional models can exceed $1000.
Ribbon Microphones: Known for their warm and natural sound, ribbon microphones are often used in studios. Prices usually start around $200 and can go up significantly.
9. Use Case
Dynamic microphones are versatile and suitable for a variety of recording situations.
Whether you’re recording in a home studio, performing live, or practicing, a good dynamic microphone will serve you well.
Their ability to handle different environments and sound sources makes them an excellent choice for vocal recording.
Share this post to help the website grow.
Help Support Acoustic Nature
If you enjoyed this post and would like to help support Acoustic Nature, please consider "buying me a coffee" or becoming a Patreon with the buttons below.
As a thank you for your support, Patreon supporters receive a copy of Field Recording For Beginners, exclusive access to the full Behind The Sounds video series, nature sound library downloads, and more.
If you are unable to support the site financially, please share this post with others, or leave a comment below letting me know you enjoyed this post! Both are free and help the website grow. Thank you ♫
Thanks for reading,
-Jared