Best Cardioid Microphone for Field Recording (Ultimate Buyers Guide)
Learn everything you need to know before purchasing a cardioid microphone, as well as the best options for 3 different budgets in this article.

Cardioid microphones are a popular choice for field recording. This article will guide you through everything you need to know before purchasing a cardioid mic and then I share my top three picks for different budget levels.
If you are new to cardioid microphones, I suggest that you read through this entire article so that when you get to the recommendations, they make sense.
To skip the informative content, click here to jump straight to the best cardioid microphones, or browse by section of interest with the menu below.
What are Cardioid Microphones?
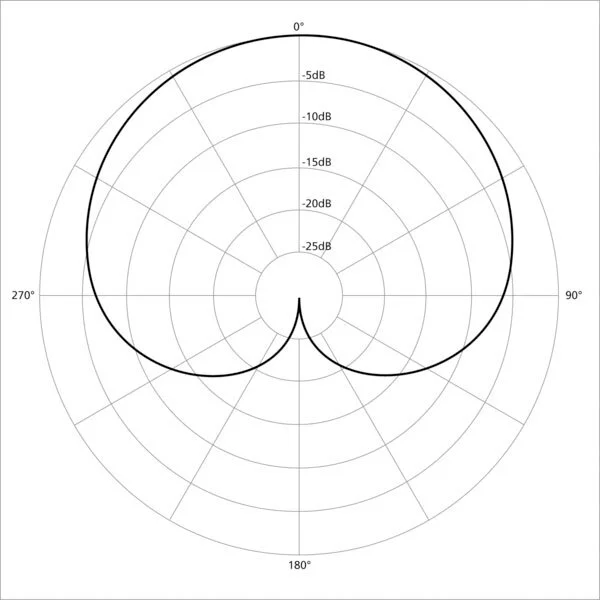
Polar plot of a cardioid microphone showing its heart-shaped pickup pattern.
A cardioid microphone is a microphone that is only sensitive to sound from the front and sides. Cardioid microphones are classified as a directional microphones because the mic’s direction will influence the recorded sound-image.
The cardioid microphone gets its name from its heart-shaped pickup pattern. The polar plot image shows this shape quite clearly.
In this image, the microphone is facing ↑ and the heart-shaped outline represents the microphone’s response to sound from 360° around the capsule.
The ability to reject sound from the back makes them a popular choice for recording speech, sound effects and stereo soundscapes.
Single cardioid mics are used for recording speech and spot sound effects in situations where you can place the microphone very close to the subject.
More commonly, pairs of cardioid microphones are arranged in different configurations to record stereo ambiances.
Stereo Miking Configurations
There are a number of different ways to setup a pair of cardioid microphones to capture stereo sound. Each technique is used for a specific purpose. Keep reading to find a configuration that matches your needs.
A stereo mic bar is used for holding multiple microphones and makes adjusting each mic quick and easy. To read more about stereo bars and different models, see my article on the subject here.
A/B

A/B stereo is the easiest technique to setup and is one of the most popular methods for recording in stereo.
Increasing the spacing between microphones increases the millisecond delay between sounds reaching each mic. This difference in arrival time is interpreted by our brains as a stereo image.
Our ears are naturally spaced 7 inches apart. Using this spacing between microphones will create a stereo image most similar to how the recorded environment would sound if we were standing there.
Spacing the microphones further apart will result in a wider stereo image. Try experimenting with this distance to find the best result for you.
Easy to setup
Adjustable stereo width
Possible phase issues with mono playback
X/Y

X/Y stereo miking uses a coincident pair of cardioid microphones angled 90° to each other (perpendicular).
Coincident refers to the close spacing of microphones. For this spacing, one microphone must be positioned slightly above the other.
This technique produces a limited stereo image and is best for close-miking situations like podcasting, single instruments and spot sound effects.
Weak stereo image
Best for close miking
Great phase coherence and mono summing
ORTF

ORTF stereo miking uses two cardioid microphones to emulate human hearing.
The mics are spaced at ear width (7”/17cm) and angled at 110°. This spacing and angle replicates the difference in arrival time and the acoustics of our head.
The ORTF technique produces a stereo image wider than X/Y but is still good for mono applications.
This technique is most often used for recording stereo ambiences and “landscapes” of sound.
If your selected microphones are long, they may cross over each other, requiring one microphone to be slightly raised on a riser.
Simulates human hearing
Best for mid-range miking
Minimal phase issues when summing to mono
Cardioid Microphone Specifications
Manufacturers can write very convincing product descriptions, but the real story is in the specifications.
Understanding microphone specifications will allow you to make the best decision for your specific needs. Read on to determine what specs are most important to you so you know what to look for when shopping for a microphone.
Self Noise
Self noise is the sound the microphone produces even when no sound source is present. This noise is produced by current running through the circuitry and sounds like white noise. All microphones produce some noise but the amount produced varies greatly between microphone models.
Depending on the amount of self-noise from the microphone, the loudness of your subject, and the distance between subject and microphone, the amount of acceptable self noise will vary.
Recording loud sounds and short distances between microphone and subject will stretch the acceptable range of microphone self-noise.
Under these circumstances, your gain will be set relatively low to avoid peaking, and your subject will easily overpower the microphone’s self noise.
However, recording quiet sounds and long distances between microphone and subject will decrease the acceptable range of microphone self-noise. Noise-free recordings under these circumstances demands very low self-noise levels.
Self Noise Levels:
Poor: 24 dB-A and above. At this level, self noise is obvious and obtrusive in any recording situation short of recording jet engines at takeoff. Well, maybe that’s a slight exaggeration. Recording any sound below 70 decibels (vacuum cleaner) will have audible self noise hissing.
Fair: 20-23 dB-A. Self noise is still clearly audible at this level when recording anything below speaking volume (60dB).
Good: 16-19 dB-A. Great for most dialog and booming applications. Some noise may be heard when recording whispers, quiet ambiances and other sounds below 30-40dB.
Very Good: 11-15 dB-A. Recordists may be able to discern some slight self noise under critical conditions. Conditions include rustling leaves and other sounds below 20dB (there’s not many).
Excellent: 10 dB-A and below. Extreme low noise. Unnoticeable in any recording situation as even the quietest recording room still has more than 10dB of ambient noise.
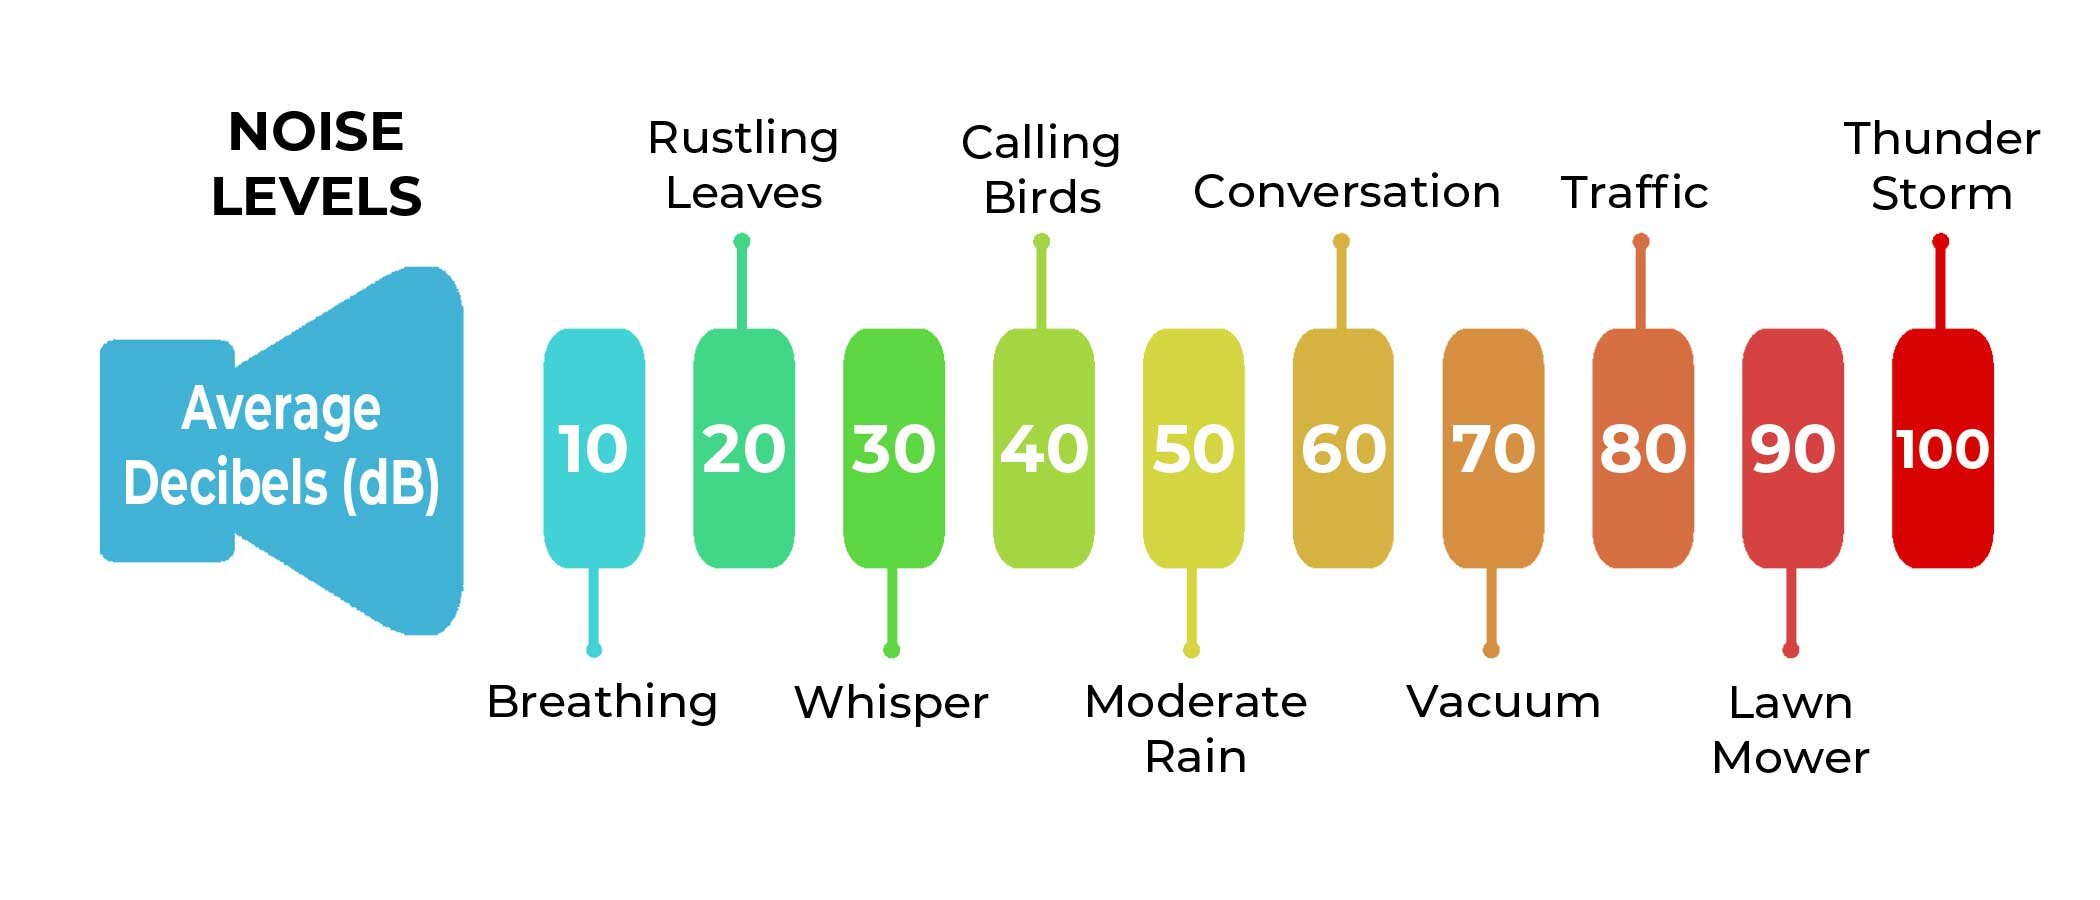
Common sounds and their associated noise levels measured in dB-A.
RELATED: Lowest Self-Noise Microphones List
Sensitivity
To put it simply, microphone sensitivity measures the amount of output for a given input. The input is the sound you are recording and the output is the actual recording.
The output of a microphone is refereed to as “the signal.”
The more sensitive a microphone is, the louder the signal will be for a given input of sound. A loud signal is ideal for low noise recordings because a lower gain can be used, keeping the noise floor low.
The best microphone sensitivity will depend on the recording application. Sometimes a lower sensitivity microphone is better, and other times, a higher sensitivity microphone is better.
Low sensitivity mics are generally better for recording isolated, loud sounds.
High sensitivity mics are generally better for recording ambient, quiet sounds.
Low sensitivity mics are good for:
close miking (lavalier, drums)
vocals in a loud environment (live music venue)
guitar and bass amps
high SPL sounds (gunshots, vehicles, etc)
High sensitivity mics are good for:
ambiences
nature sounds
parabolic microphones
voice-over work
Microphone Sensitivity Levels:
Low sensitivity: -60 dBV→-50 dBV. Best for drums, instruments, vocals (singing) and other loud signals
Medium sensitivity: -50 dBV→-40 dBV. Best for hand-held microphones, voice-over work and loud ambient environments.
High sensitivity: -40 dBV→-30 dBV. Best for boom miking, natural sounds and most ambient environments
Extremely high sensitivity: -30 dBV and below. Best for distant miking, very quiet sounds and ambient environments.Self-noise
Pads and Filters
Some microphones have additional functionality built-in in the form of pads and filters. They are typically operated with switches or buttons located on the microphone body. Continue reading to determine if either will be an essential tool for you.
Pads:
PAD stands for “Passive Attenuation Device.” A microphone pad attenuates (reduces) the volume of the signal. This functionality enables very loud sounds to be recorded without audio distortion.
Another way of thinking about this is - a pad reduces the sensitivity of the microphone, making everything sound quieter.
If you have your gain set very low and your audio is still peaking, turning on a pad can allow you to record the audio without distortion.
Pads are measured in decibels. A -10 dB pad will attenuate the overall signal by 10 decibels.
Filters:
Unless you are constantly recording very loud sound sources, you will likely find filters much more useful.
Most microphones are more sensitive to lower frequencies than our own ears. This can result in recordings sounding unnaturally bass-heavy and “rumbly.”
This can be fixed in post-production with simple EQ, but getting the recording right in-the-field is always easier. High-pass, filters allow you to achieve this.
High-pass filters (also called low-cut filters) allow high-frequency sounds to pass through unfiltered. Low-frequency sounds are decreased in volume by the high-pass filter.
They work by setting a cutoff frequency that attenuates signals with frequencies lower than the cutoff frequency. All the terminology packed into that description makes a high-pass filter better understood with a visual.
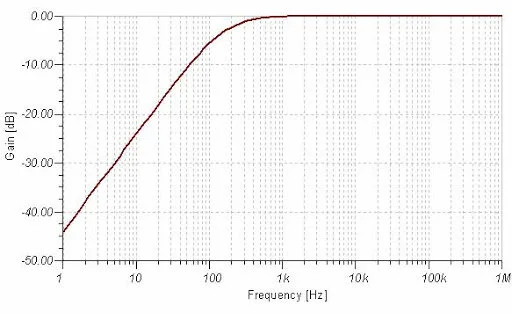
Sound spectrum view of a high-pass filter. In this example, the cutoff frequency is set to about 1000 Hz. Frequencies below this point are attenuated by a smooth curve down to -45 dB @ 1 Hz.
High-pass filters are useful for natural-sounding recordings in most circumstances and especially useful for removing low-frequency, wind sounds.
You would not want to use a high-pass filter when recording low-frequency sounds such as thunderstorms, fireworks, gunshots and many other sound effects.
Best Cardioid Microphones
There are many cardioid microphones on the market. What sets them apart are their specifications and price. I researched the market extensively to find the best microphones for different budget levels. The results are below :)
Best Value:

Audio Technica AT4021
The AT4021 is the best value cardioid microphone for field recording because of its balance of self-noise, sensitivity and features.
With a self-noise level of only 14 dB-A, the AT4021 is ultra-quiet. It is capable of recording the quietest of sound sources without any perceptible noise in the final recording.
The AT4021 is also highly sensitive, measuring in at -34 dBV.
The AT4021 also has onboard controls, including a -10 dB pad and a 80 Hz high-pass filter.
The mic is machined from brass, making it a good, durable choice for the field.
The Bottom Line:
These specifications make the AT4021 a popular microphone for field recording. It is ultra low-noise, highly sensitive, full of features, built to last, and doesn’t cost a fortune. If you’re in the market for a new cardioid mic, the Audio Technica AT4021 should be on your list.
|
Self-noise: |
14 dB-A |
| Sensitivity: | -34 dBV |
| Pad: | -10 dB |
| Filter: | 80 Hz, 18 dB/Octave |
| Power: | 48 V (Phantom) |
| Diameter: | 21 mm |
| Construction: | Brass |
Best Budget:

Rode M5 Matched Pair
The Rode M5 cardioid microphones offer good performance at an unbeatable price. A matched pair can be had for as little as $199.
With a self-noise of 19 dB-A, they’re between a “good” and “fair” rating. This self-noise will be noticeable for recording sound quieter than 40 dB-A (average decibel level of calling birds).
The low price of the M5s doesn’t sacrifice any sensitivity, measuring the same as the AT4021s at -34 dBV.
The Bottom Line:
If you are on a tight budget, need a stereo pair of mics, and mainly record louder sounds like speech, rain, flowing water, instruments, and other louder ambiences, the M5s are a great choice.
|
Self-noise: |
19 dB-A |
| Sensitivity: | -34 dBV |
| Pad: | none |
| Filter: | none |
| Power: | 24/48 V (Phantom) |
| Diameter: | 20 mm |
Best Professional:

Sennheiser MKH 40
The Sennheiser MKH 40 is the best performing cardioid microphone on the market hands-down.
Coming in at just 12 dB-A of self-noise, it is capable of recording the quietest sounds on the planet without any perceptible noise.
The MKH 40 is also extremely sensitive at -32 dBV, the best we’ve seen so far.
The Bottom Line:
The Sennheiser MKH 40 is for the professional who demands the maximum performance from their gear. The Sennheiser brand is so well-respected that simply owning this microphone can help you land more sound jobs.
UPDATE: Although the MKH 40 is still available through some retailers, as of January, 2021, Sennheiser has discontinued it. It has been replaced by the MKH8040.
|
Self-noise: |
12 dB-A |
| Sensitivity: | -32 dBV |
| Pad: | -10 dB |
| Filter: | 30 Hz, 12 dB/Octave |
| Power: | 48 V (Phantom) |
| Diameter: | 25 mm |
Final Thoughts
Finding the best microphone is all about understanding what specifications are most important to you, and then finding the best model you can afford for your given budget. After reading this article, I hope you feel confident in your knowledge of cardioid microphones to make the best decision for you!
If you have found this article helpful in making your decision, please consider purchasing your new microphone through the links on this page. For no additional cost, Amazon will give me a very small commission. Thank you for helping to support this blog!
Support Acoustic Nature
If you enjoyed this post and would like to help support Acoustic Nature, please consider "buying me a coffee" or becoming a Patreon with the buttons below.
As a thank you for your support, Patreon supporters receive a copy of Field Recording For Beginners, exclusive access to the full Behind The Sounds video series, nature sound library downloads, and more.
If you are unable to support the site financially, please share this post with others, or leave a comment below letting me know you enjoyed this post! Both are free and help the website grow. Thank you ♫
Thanks for reading,
-Jared